1 负载均衡基本概念
NGINX不仅是一个高性能的Web服务器,同时还提供了强大的负载均衡功能。它支持基于HTTP、HTTPS、TCP和UDP协议的负载均衡,为不同的应用场景提供了解决方案。在开源版本的NGINX中,提供了被动的健康检查,这有助于减少上游服务器的压力。而在NGINX Plus版本中,除了被动健康检查,还提供了主动健康检查功能。
主动健康检查每隔一段时间就会向上游服务器发起连接或请求,以确保服务器的健康状态。这虽然会带来一定的系统负载,但能够更及时地发现问题,并提供更高的服务可用性。
2 环境介绍与架构图
| 操作系统 | IP地址 | 主机名 | NGINX版本 | 角色 |
|---|---|---|---|---|
| Rocky 9.6 | 192.168.8.4 | loadbalance.luovip.cn | 1.26.2 | 负载均衡 |
| Rocky 9.6 | 192.168.8.5 | web1.luovip.cn | 1.26.2 | 普通业务服务器 |
| Rocky 9.6 | 192.168.8.6 | web2.luovip.cn | 1.26.2 | 普通业务服务器 |
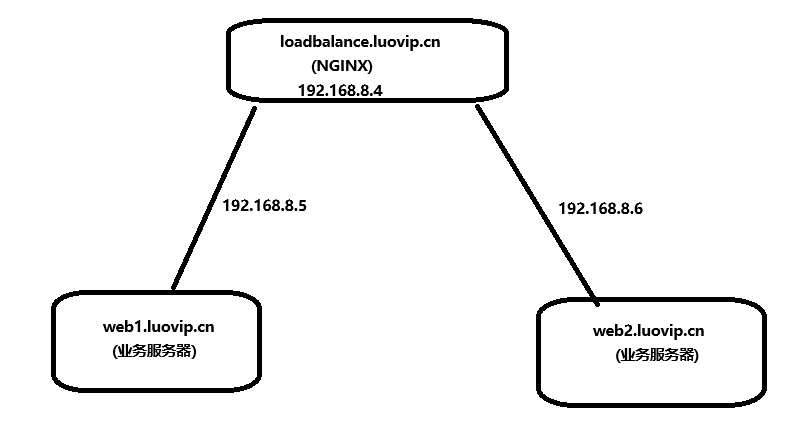
在这个架构中,NGINX负载均衡器loadbalance.luovip.cn(IP地址192.168.8.4)负责将请求分发到两台普通业务服务器web1.luovip.cn(IP地址192.168.8.5)和web2.luovip.cn(IP地址192.168.8.6)
3 实验先决条件准备
3.1 准备hosts文件
这一步,需要在所有机器上完成准备,以便于大家都能用名称互相解析和访问
cat > /etc/hosts <<EOF
192.168.8.4 loadbalance.luovip.cn loadbalance
192.168.8.5 web1.luovip.cn web1
192.168.8.6 web2.luovip.cn web2
EOF
3.2 部署业务服务器
快速部署两台业务服务器,需要让每个服务器上的页面显示不同的内容以区分主机,每个主机需开通防火墙
# 部署web1.luovip.cn
[root@web1 ~]# cd /etc/yum.repos.d/
[root@web1 yum.repos.d]# vim nginx.repo
[nginx]
name=nginx repo
baseurl=http://nginx.org/packages/centos/9/x86_64/
gpgcheck=0
enabled=1

[root@web1 ~]# dnf makecache

[root@web1 ~]# dnf install nginx-1.26.2 -y

[root@web1 ~]# echo "Hello nginx,I'm Chinese" > /usr/share/nginx/html/index.html
[root@web1 ~]# cat /usr/share/nginx/html/index.html
Hello nginx,I'm Chinese

[root@web1 ~]# systemctl enable nginx --now
[root@web1 ~]# systemctl status nginx

[root@web1 ~]# firewall-cmd --add-service=http --permanent
success
[root@web1 ~]# firewall-cmd --reload
success
[root@web1 ~]# curl http://192.168.8.5
Hello nginx,I'm Chinese

# 部署web2.luovip.cn
[root@web2 ~]# cd /etc/yum.repos.d/
[root@web2 yum.repos.d]# vim nginx.repo
[nginx]
name=nginx repo
baseurl=http://nginx.org/packages/centos/9/x86_64/
gpgcheck=0
enabled=1

[root@web2 ~]# dnf makecache

[root@web2 ~]# dnf install nginx-1.26.2 -y

[root@web2 ~]# echo "Hello nginx,I'm Country" > /usr/share/nginx/html/index.html
[root@web2 ~]# cat /usr/share/nginx/html/index.html
Hello nginx,I'm Country

[root@web2 ~]# systemctl enable nginx --now
[root@web2 ~]# systemctl status nginx

[root@web2 ~]# firewall-cmd --add-service=http --permanent
success

[root@web2 ~]# firewall-cmd --reload
success

[root@web2 ~]# curl http://192.168.8.6
Hello nginx,I'm Country
4 负载均衡实践
4.1 HTTP 负载均衡
在这个配置中:
upstream load:定义了一个名为load的上游服务器组。
server 192.168.8.5:80 weight=1 max_fails=3 fail_timeout=3s:定义了第一台后端服务器,权重为1,最大失败次数为3,超时时间为3秒。
server 192.168.8.6:80 weight=2 max_fails=3 fail_timeout=3s:定义了第二台后端服务器,权重为2,最大失败次数为3,超时时间为3秒。
server 192.168.8.7:80 backup max_fails=3 fail_timeout=3s:定义了备份服务器,最大失败次数为3,超时时间为3秒。
server_name loadbalance.luovip.cn:设置了虚拟主机名。
proxy_pass http://load:将请求转发到上游服务器组。
# 配置文件修改参考 /etc/nginx/conf.d/default.conf
[root@loadbalance ~]# vim /etc/nginx/conf.d/httpha.conf
upstream load {
 server 192.168.8.5:80 weight=1 max_fails=3 fail_timeout=3s;
 server 192.168.8.6:80 weight=2 max_fails=3 fail_timeout=3s;
 server 192.168.8.7:80 backup max_fails=3 fail_timeout=3s;
}
server {
 listen 80;
 server_name loadbalance.luovip.cn;
 location / {
 proxy_pass http://load;
 }
}

# 让nginx重新加载配置文件生效
[root@loadbalance ~]# nginx -t
nginx: the configuration file /etc/nginx/nginx.conf syntax is ok
nginx: configuration file /etc/nginx/nginx.conf test is successful

[root@loadbalance ~]# nginx -s reload
第三个服务器后面的backup可以是以下的几种:
| 选项 | 含义 |
|---|---|
| down | 目前宕机,不参与负载均衡 |
| backup | 当具有权重的正常服务器全宕机后,此服务器将启用 |
| max_fails | 最大请求失败次数 |
| fail_timeout | 超过最大失败次数后,暂停多长时间 |
| max_conns | 最大连接数 |
测试负载均衡效果,需要将SELinux的布尔值打开,或者关闭SELinux,不然nginx将无法作为负载均衡工作
[root@loadbalance ~]# setsebool -P httpd_can_network_relay on

# 当多次访问loadbalance的时候,会返回不同主机上的内容
[root@loadbalance ~]# curl http://loadbalance.luovip.cn
Hello nginx,I'm Country

[root@loadbalance ~]# curl http://loadbalance.luovip.cn
Hello nginx,I'm Chinese

# 临时关闭SELinux测试
[root@loadbalance ~]# setenforce 0
[root@loadbalance ~]# curl http://loadbalance.luovip.cn
Hello nginx,I'm Country

[root@loadbalance ~]# curl http://loadbalance.luovip.cn
Hello nginx,I'm Chinese
4.2 TCP 负载均衡
nginx 使用stream模块来完成TCP端口负载均衡,所以需要在主配置文件中打开stream功能,并将stream配置文件单独存储,方便管理
stream代码段不能写到http代码段内,要和http同级
[root@loadbalance ~]# vim /etc/nginx/nginx.conf

user  nginx;
worker_processes  auto;

error_log  /var/log/nginx/error.log notice;
pid        /var/run/nginx.pid;


events {
    worker_connections  1024;
}

stream {
    include /etc/nginx/stream.conf.d/*.conf;
}

http {
    include       /etc/nginx/mime.types;
    default_type  application/octet-stream;

    log_format  main  '$remote_addr - $remote_user [$time_local] "$request" '
                      '$status $body_bytes_sent "$http_referer" '
                      '"$http_user_agent" "$http_x_forwarded_for"';

    access_log  /var/log/nginx/access.log  main;

    sendfile        on;
    #tcp_nopush     on;

    keepalive_timeout  65;

    #gzip  on;

    include /etc/nginx/conf.d/*.conf;
}

# 从配置文件中看出,将stream功能的配置文件放入了/etc/nginx/stream.conf.d/,这个位置需要建出来
[root@loadbalance ~]# mkdir /etc/nginx/stream.conf.d/
[root@loadbalance ~]# vim /etc/nginx/stream.conf.d/tcp.conf
upstream backend {
    server 192.168.8.5:22 weight=1 max_fails=3 fail_timeout=30s; # 业务服务器1,SSH端口22
    server 192.168.8.6:22 weight=2 max_fails=3 fail_timeout=30s; # 业务服务器2,SSH端口22
    server 192.168.8.7:22 backup max_fails=3 fail_timeout=30s;   # 备份服务器,SSH端口22
}

server {
    listen 3000; # 将负载均衡器监听端口更改为3000或你需要的端口
    proxy_pass backend;
}
这个配置文件主要是用于实现基于 TCP 协议的负载均衡,特别是针对 SSH 流量。NGINX 监听 3000 端口的连接请求,然后根据配置的权重和健康检查机制,将请求转发到后端的 SSH 服务器(192.168.8.5、192.168.8.6 和 192.168.8.7)。
upstream backend:定义了一个名为 backend 的上游服务器组。
server 192.168.8.5:22 weight=1 max_fails=3 fail_timeout=30s:
192.168.8.5:22:服务器的 IP 和端口号(SSH端口 22)。
weight=1:设置此服务器的权重为1,表示流量分配到此服务器的比例较低。
max_fails=3:如果服务器失败次数超过3次,则认为服务器不可用。
fail_timeout=30s:在30秒内,如果服务器连续失败达到 max_fails,则将其标记为不可用。
其他服务器配置(192.168.8.6 和 192.168.8.7)类似,只是权重和角色(备份服务器)不同。
listen 3000:NGINX 监听 3000 端口,所有进入 3000 端口的 TCP 请求都会被处理。
proxy_pass backend:将接收到的流量转发到上游服务器组 backend。
# 将以上代码复制粘贴到loadbalance服务器后,让nginx重新加载配置文件生效
[root@loadbalance ~]# nginx -t
nginx: the configuration file /etc/nginx/nginx.conf syntax is ok
nginx: configuration file /etc/nginx/nginx.conf test is successful

[root@loadbalance ~]# nginx -s reload
验证效果:用ssh连接负载均衡的3000端口,发现最终登录了web1主机
[root@loadbalance ~]# ssh root@loadbalance.xiaohui.cn -p 3000
root@loadbalance.luovip.cn's password:

[root@web1 ~]# exit
logout
Connection to loadbalance.luovip.cn closed.
4.3 UDP负载均衡
listen 的端口号之后指明为UDP即可,基本配置和上面的TCP很像,这里只做示意
cat > /etc/nginx/stream.conf.d/udp-dns.conf <<EOF
upstream dns_servers {
    server 192.168.8.5:53 weight=1 max_fails=3 fail_timeout=30s; # 业务服务器1,DNS端口53
    server 192.168.8.6:53 weight=2 max_fails=3 fail_timeout=30s; # 业务服务器2,DNS端口53
    server 192.168.8.7:53 backup max_fails=3 fail_timeout=30s;   # 备份服务器,DNS端口53
}

server {
    listen 53 udp; # 监听 UDP 53 端口
    proxy_pass dns_servers;
}
EOF
upstream dns_servers:定义一个名为 dns_servers 的上游服务器组,其中包含了三个后端服务器。每个服务器配置了 IP 地址、端口、权重、最大失败次数和失败超时时间。
server:
listen 53 udp:NGINX 监听 UDP 53 端口(通常用于 DNS 服务)。
proxy_pass dns_servers:将接收到的 UDP 流量转发到上游服务器组 dns_servers。
将以上代码复制粘贴到loadbalance服务器后,让nginx重新加载配置文件生效
[root@loadbalance ~]# nginx -t
nginx: the configuration file /etc/nginx/nginx.conf syntax is ok
nginx: configuration file /etc/nginx/nginx.conf test is successful

[root@loadbalance ~]# nginx -s reload

# 不做效果测试,如果要做效果测试,需要在web1和web2上部署dns服务
5 不同负载均衡类型配置示意
NGINX的负载均衡类型:最少连接、最少时间、轮询调度、通用哈希、随机调度、IP哈希
NGINX 提供了多种负载均衡算法,使其能够灵活地处理不同的流量分配需求。以下是一些常见的负载均衡类型:
5.1 最少连接(Least Connections)
将新请求分配给当前活动连接数最少的后端服务器。适用于请求处理时间较长的场
配置示例:
upstream backend {
    least_conn;
    server backend1.example.com;
    server backend2.example.com;
}
5.2 最少时间(Least Time)
根据请求处理时间,将新请求分配给响应时间最短且当前活动连接数最少的后端服务器。适用于需要快速响应的场景。
配置示例(需要 NGINX Plus):
upstream backend {
    least_time header;
    server backend1.example.com;
    server backend2.example.com;
}
5.3 轮询调度(Round Robin)
将新请求按照循环顺序分配给后端服务器。适用于大多数场景。
配置示例(默认配置):
upstream backend {
    server backend1.example.com;
    server backend2.example.com;
}
5.4 通用哈希(Generic Hash)
基于用户定义的哈希方法,将请求分配给特定的后端服务器。适用于需要特定规则进行流量分配的场景。
配置示例:
upstream backend {
    hash $request_uri;
    server backend1.example.com;
    server backend2.example.com;
}
5.5 随机调度(Random with Two Choices)
随机选择两台后端服务器,然后将请求分配给其中负载较小的一台。适用于需要均匀分配负载的场景。
配置示例(需要 NGINX Plus):
upstream backend {
    random two least_conn;
    server backend1.example.com;
    server backend2.example.com;
}
5.6 IP哈希(IP Hash)
基于客户端 IP 地址的哈希值,将请求分配给特定的后端服务器。适用于需要保持会话一致性的场景。
配置示例:
upstream backend {
    ip_hash;
    server backend1.example.com;
    server backend2.example.com;
}