1 介绍Ansible
Ansible是python开发的、开源的批量自动化运维工具
官方网站:https://www.ansible.com、https://docs.ansible.com/

1.1 Ansible的概念和架构
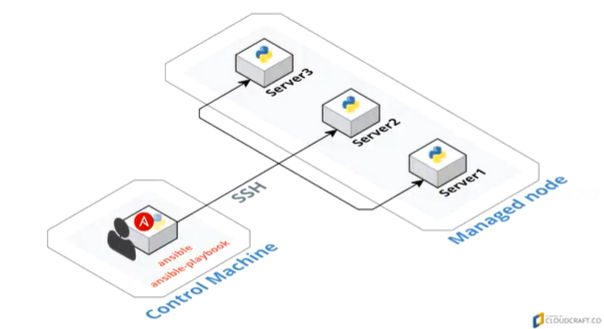
通过inventor定义Managed node,并由SSH与python进行连通:
1.管理机上管理被管机
2.inventory(清单)分组被管机
3.基于SSH、PowerShell进行PUSH ad-hoc或基于YML文件Playbook
4.Python模块、插件、API
1.2 Absible的优势
简单明了:Ansible playbook,更好的对任务进行排序编写
功能强大:3000多个模块,配置管理、工作流自动化、网络自动化
无需代理:通过SSH管理,而puppet、saltstack需要装客户端
与其他系统轻松集成,如jenkins
跨平台支持:win、linux、unix、网络设备,虚拟机、物理机、云主机、容器
1.3 Ansible自动化平台2
1.Ansible自动化平台2-Ansible Core
包含多个不同的组件,共同提供了一整套集成的自动化工具和资源
提供用于运行Ansible Playbook的基本功能
定义了用于在YAML文本文件中编写Ansible Playbook的自动化语言
提供了自动化代码所需的关键功能,如循环、条件和其他Ansible命令
提供了驱动自动化所需的框架和基本命令行工具
在ansible-core RPM软件包及其ee-minimal-rhel8和ee-supported-rhel8自动化执行环境中提供Ansible Core 2.13
2.Ansible自动化平台2-Ansible内容集合
在过去,Ansible提供了大量模块作为核心软件包的一部分;这种方法在Ansible社区中被称为“自带电池”
Ansible中包含的模块数量呈指数级增长。这导致了支持方面的一些挑战,特别是因为用户有时希望使用比Ansible特定版本中附带模块版本更早或更高的模块
开发人员决定将大多数模块重新整理为单独的Ansible collection(内容集合),这些资源collection相关的模块角色和插件构成,由同一组开发人员提供支持
Ansible Core本身仅限于由ansible.builtin、Ansible collection(内容集合)提供的一小组模块,该集合始终是Ansible Core的一部分
订阅红帽Ansible自动化平台2后,可获得红帽提供的120多个认证内容集合的访问权限,另外还可通过AnsibleGalaxy获得很多受社区支持的集合
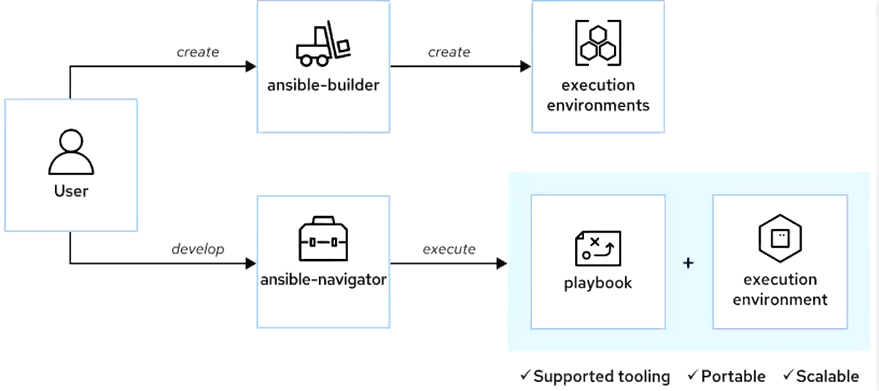
3.Ansible自动化平台2概述-自动化内容导航器
红帽Ansible自动化平台2还可提供新的顶级工具(自动化内容导航(ansble-navigator))来开发和测试Ansible Playbook。该工具可取代并扩展多个命令行实用程序的功能,包括ansible-playbook、ansible-inventory、ansible-config
通过在容器中运行playbook,将运行Ansible的控制节点与运行它的自动化执行环境分隔开来。这样一来,可以更轻松地为自动化代码提供完整的工作环境,以部署到生产环境中
4.Ansible自动化平台2-自动化执行环境
自动化执行环境是一种容器镜像,包含Ansible Core、Ansible内容集合以及运行playbook所需的任何Python库、可执行文件或其他依赖项
使用ansible-navigator运行playbook时,可选择用于运行该playbook的自动化执行环境
当代码运行时,可以向自动化控制器提供playbook和自动化执行环境,并且也知道其具有正确运行playbook所需的一切
5.Ansible自动化平台2-准备控制节点
要运行Ansible Playbook,需在控制节点安装自动化内容导航器(ansible-navigator),然后下载执行环境
由Ansible托管的主机无需安装ansible-navigator,该工具只需安装在运行Ansible Playbook的控制节点
安装ansible-core软件包前,先要在控制节点上安装Python3.8或更高版本
需要有效的红帽Ansible自动化平台订阅,才能在控制节点上安装自动化内容导航器
如果已在红帽客户门户中为您的组织激活了简单内容访问,则无需再将订阅连接到系统
2 部署Ansible
2.1 安装Ansible
2.1.1 安装自动化内容导航器
# 登录workstation后默认为student普通用户,根据实际使用和考试结合建议使用普通用户操作
# 方法1:
[kiosk@foundation0 ~]$ ssh student@workstation

# 方法2:
[kiosk@foundation0 ~]$ ssh root@workstation
[root@workstation ~]$ ssh student@localhost

# 控制节点上安装自动化内容导航器    - workstation
[student@workstation ~]$ sudo dnf search ansible   #搜索ansible关键字的软件包,方便查找ansible的软件

[student@workstation ~]$ sudo dnf -y install ansible-navigator.noarch ansible-core.x86_64

[student@workstation ~]$ rpm -q ansible-navigator
ansible-navigator-2.1.0-1.el9ap.noarch

[student@workstation ~]$ rpm -q ansible-core
ansible-core-2.13.0-2.el9ap.x86_64

[student@workstation ~]$ rpm -qc ansible-core
/etc/ansible/ansible.cfg    # 默认全局配置文件
/etc/ansible/hosts          # 默认全局清单文件

[student@workstation ~]$ rpm -qc ansible-navigator
2.1.2 检查Ansible版本
# 检查ansible的版本
[student@workstation ~]$ ansible --version
ansible [core 2.13.0]
  config file = /etc/ansible/ansible.cfg
...

[student@workstation ~]$ ansible-navigator --version
ansible-navigator 2.1.0

# 安装ansible后会提供导航器配置文件
[student@workstation ~]$ ls -a
.   .ansible               .ansible-navigator.yml  .bash_logout   .bashrc  .config  Documents  .grading  .jupyter  Music  Pictures  .ssh       .venv
..  ansible-navigator.log  .bash_history           .bash_profile  .cache   Desktop  Downloads  .ipython  .local    .npm   Public    Templates  Videos
[student@workstation ~]$ cat .ansible-navigator.yml
---
ansible-navigator:
  execution-environment:
    image: utility.lab.example.com/ee-supported-rhel8:latest
    pull:
      policy: missing
2.1.3 登录镜像仓库
# 配置镜像仓库不进行https验证
[student@workstation ~]$ mkdir ~/.config/containers

# ~/.config/containers等价于/home/student/.config/containers
[student@workstation ~]$ cp /etc/containers/registries.conf ~/.config/containers
[student@workstation ~]$ vim ~/.config/containers/registries.conf
unqualified-search-registries = ["utility.lab.example.com"]  # 22行
[[registry]]  # 24行
insecure = true  # 37行
blocked = false   # 40行
location = "utility.lab.example.com"  # 56行

# 登录容器镜像服务器,为下载自动化执行环境容器镜像做准备
[student@workstation ~]$ podman --version
podman version 4.0.2

[student@workstation ~]$ podman login -u admin -p redhat utility.lab.example.com
Login Succeeded!

# 下载自动化内容导航器或使用ansible-navigator命令自动下载
[student@workstation ~]$ ansible-navigator collections

[student@workstation ~]$ ansible-navigator images   # 查看下载的镜像环境
2.2 构建Ansible清单
2.2.1 默认的清单文件
# 清单定义Ansible管理的主机集合。主机可以分配到组中进行集中管理。组可以包含子组,主机也可以是多个组的成员
# 清单还可以设置应用到它所定义的主机和组的变量
# 定义主机清单可采用两种方式:
  1.使用文本文件定义静态主机清单
  2.通过外部信息提供程序,使用Ansible插件按需生成动态主机清单
# 系统默认清单在/etc/ansibile/hosts

# 举例:
# [嵌套组名:children],嵌套组内只能包含组,不包含主机
[test]
servera

[web]
serverb.example.com

[webservers]
web[1:50].example.com   # 表示从web1到web50,共计50台主机

[servers:children]  # 表示servers组是一个超级组,包含test和web两个组(嵌套)
test
web
webservers

# 指定清单范围格式:通配符或正则表达式的方法
[START:END]                  #开始:结束范围
192.168.[0:15].[0:255]       #表示   192.168.0.0-192.168.15.255
server[a:c].example.com      #表示   a-c
server[01:15].example.com    #表示   server01.example.com-server15.example.com
all:                        #表示   所有主机
ungrouped:                   #表示   指定组/未分配组的主机
2.2.2 自定义清单文件
1.创建工作目录
# 当使用特权用户管理Ansible时,可以在家目录中为其创建工作目录
# 目录名称可以根据业务自定义名称,后续的所有文件都放到此目录,包括配置文件、清单文件、playbook等
[student@workstation ~]$ mkdir ~/ansible
[student@workstation ~]$ cd ~/ansible/
[student@workstation ansible]$ pwd
/home/student/ansible

# 查看清单实例文件
[student@workstation ansible]$ ansible-doc -t inventory -l
[student@workstation ansible]$ ansible-doc -t inventory ini
[student@workstation ~]$ ansible-navigator doc -t inventory ini
2.编辑自定义清单文件
[student@workstation ansible]$ vim inventory
servera                    # 未在组内的主机

[web]                      # 主机组,主机组名称需要使用中括号括起来[],web是组名称
server[b:c]                # 主机组成员,web组内的主机 表示两个主机serverb至serverc
172.25.250:[10:15]

[db]
server[d:z].lab.example.com

# 嵌套组名servers是自定义的,:children是固定语法,表示web、db在servers组中,嵌套组成员应为组,不应为主机
[servers:children]
web
db
# 不要在清单里书写无用的符号,及一些特殊符号。主机名称不要和主机组冲突,组名尽量不要用数字开头
3.验证清单
# 使用ansible-navigator或ansible-inventory命令验证计算机是否存在于清单中
  1.ansible-navigator inventory以stdout模式运行
  2.第一条传统Ansible的验证方式,第二条使用Ansible自动化平台2的方式
-RHEL8 & 9
-i inventory  # 指定清单文件的位置
--list-hosts  # 列出清单中的主机
--graph       # 通过ansible-inventory命令列出清单整个pattern

$ ansible all -i inventory --list-hosts
$ ansible-inventory --graph -i inventory
[student@workstation ansible]$ ansible-inventory --graph -i /home/student/ansible/inventory

-RHEL 9
$ ansible-navigator inventory -i inventory  -m stdout --list
$ ansible-navigator inventory -i inventory  -m stdout --graph
$ ansible-navigator inventory -i inventory  -m stdout --graph webservers

重要:清单中含有名称相同的主机和主机组,ansible命令显示警告并以主机作为其目标,组被忽略
2.2.3 覆盖清单位置
# 安装ansible软件后,在/etc/ansible/hosts位置提供一个默认主机清单,属于全局管理范围
# 特权用户管理时可以为其在工作目录中创建清单,在工作目录中使用ansible时,且优先度最高
/home/student/ansible/inventory   # 用于针对某个用户设置清单
/etc/ansible/hosts                  # 用于全局设置
[student@workstation /]$ ansible-inventory --graph
@all:
  |--@ungrouped:
[student@workstation /]$ pwd
/
[student@workstation ansible]$ ansible-inventory --graph
@all:
  |--@ungrouped:
[student@workstation ansible]$ pwd
/home/student/ansible
2.2.4 多清单
# 一个用户可以有一个或多个清单文件,若同时使用,可将多个清单文件放置在清单目录中,清单目录需自行创建,名称自定义
[student@workstation ansible]$ vim inventory
servera

[web]
serverb
serverc

[db]
serverd

[servers:children]
web
db
[student@workstation ansible]$ ansible-inventory --graph -i inventory

[student@workstation ansible]$ cp inventory inventory2       #额外创建一份清单名为inventory2
# [student@workstation ansible]$ echo servere > inventory2   #inventory2内指定一个主机servere
[student@workstation ansible]$ vim inventory2
servere

[student@workstation ansible]$ mkdir invdir                   #创建清单存储目录,名称自定义
[student@workstation ansible]$ mv inv* invdir/                #将所有清单移动至清单存储目录
mv: cannot move 'invdir' to a subdirectory of itself, 'invdir/invdir'
[student@workstation ansible]$ ls invdir/
inventory  inventory2

[student@workstation ansible]$ ansible-inventory --graph -i invdir/  #查看主机模式结构
2.3 管理Ansible配置文件
2.3.1 配置Ansible
# 安装Ansible软件后,自动生成配置文件
   /etc/ansible/ansible.cfg  用于配置多个Ansible工具的行为
   ~/.ansible-navigator.yml  用于更改ansible-navigator命令默认选项
[student@workstation ansible]$ rpm -qc ansible-core
/etc/ansible/ansible.cfg
/etc/ansible/hosts
[student@workstation ~]$ ls -a
.         ansible                 .bash_history  .bashrc  Desktop    .grading  .lesshst  .npm      .ssh       Videos
..        ansible-navigator.log   .bash_logout   .cache   Documents  .ipython  .local    Pictures  Templates  .viminfo
.ansible  .ansible-navigator.yml  .bash_profile  .config  Downloads  .jupyter  Music     Public    .venv
[student@workstation ~]$ ls -a ~/.ansible-navigator.yml
/home/student/.ansible-navigator.yml
2.3.2 管理Ansible设置
| 指令 | 描述 |
|---|---|
| inventory | 指定清单文件的路径。 |
| remote_user | 指定Ansible用于连接受管主机的用户名。如果未指定,则使用当前用户的名称。(在由ansible-navigator 运行的基于容器的自动化执行环境中,始终为 root。) |
| ask_pass | 指示是否提示输入SSH 密码。 (可以是 false,如果使用SSH公钥身份验证,则此为默认值。) |
| become | 指定连接后是否在受管主机上自动切换用户(一般切换为root)。这也可以通过play来指定 |
| become_method | 指定如何切换用户(通常为 sudo,此为默认值,但也可选择su) |
| become_user | 指定要在受管主机上切换到哪个用户(通常为 root,此为默认值) |
| become_ask_pass | 指示是否提示输入become_method参数密码。默认为false |
2.3.3 管理配置文件
1.自定义配置文件
# 在工作目录中生成ansible的配置文件
[student@workstation ~]$ cat /etc/ansible/ansible.cfg | grep ansible.cfg
#               $ ansible-config init --disabled > ansible.cfg
...

[student@workstation ~]$ ansible-config init --disabled > /home/student/ansible/ansible.cfg

[student@workstation ~]$ cd /home/student/ansible/
[student@workstation ansible]$ ls
ansible.cfg  inventory

[student@workstation ansible]$ ansible --version
ansible [core 2.13.0]
  config file = /home/student/ansible/ansible.cfg

# Ansible的配置文件(ansible.cfg)由几部分组成,含有以键值对形式定义的设置、标题以方括号括起
# 对于基本操作,使用以下两部分:
1.[defaults]---用于设置Ansible操作的默认值
2.[privilege_escalation]---用于配置Ansible如何在受管主机上执行特权升级

[student@workstation ansible]$ vim ansible.cfg
[defaults]
inventory=/home/student/ansible/inventory    #139行  工作目录清单位置
remote_user=student                             #222行  远程用户可选root或普通用户
host_key_checking=false                         #318行  不进行公钥记录

[privilege_escalation]                        #搜/become,n向下查找 或 输入:430
become=true                                    #430行  开启特权功能,
#become_ask_pass=False                        #433行  远程免特权密码,需要对端添加sudo免密
#become_method=sudo                            #442行  远程功能启用sudo
#become_user=root                            #445行  特权用户为root

备注:剪切操作 dd+p
# 验证配置文件是否书写正确
[student@workstation ansible]$ ansible-inventory --graph   # 取消对清单的指定

#为servera~d主机设置sudo免密。
[workstation]
[student@workstation ansible]$ for i in {a..d};do ssh root@server$i 'sed -i s/^%wheel.*$/"%wheel  ALL=(ALL) NOPASSWD: ALL"/ /etc/sudoers';done
[student@workstation ansible]$ for i in {a..d};do ssh root@server$i 'grep ^%wheel /etc/sudoers';done

# 测试远程部署
[student@workstation ansible]$ ansible all -m ping
serverd | SUCCESS => {
    "ansible_facts": {
        "discovered_interpreter_python": "/usr/bin/python3"
    },
    "changed": false,
    "ping": "pong"
}
...
2.配置文件的优先级
$ /etc/ansible/ansible.cfg           #默认路径
$ ~/.ansible.cfg                       #家目录
$ ~/ansible/ansible.cfg              #ansible为工作目录(练习和考试时使用)
$ grep  ANSIBLE_CONFIG /etc/profile  #环境变量
export  ANSIBLE_CONFIG=/opt/ansible.cfg   (此时/opt下需要有ansible.cfg配置文件)
source /etc/profile   加载

# 优先级 :变量>当前目录>用户家目录>/etc
3.指定远程用户
# 其他指定远程用户及密码的方法
# 方法1:
ansible.cfg
remote_user=root
inventory
[all:vars]
ansible_password=redhat

# 方法二:
inventory
[all:vars]
ansible_user=root
ansible_password=redhat
2.3.4 管理自动化内容导航器
1.创建自动化内容导航器
#可以为ansible-navigator创建配置文件以覆盖其配置设置的默认值,采用JSON(json)或YAML(yml或yam)格式

#自动化内容导航器按以下顺序查找配置文件,并使用它找到的第一个文件:
1.如果设置了ANSIBLE NAVIGATOR_CONFIG环境变量,则使用所指定位置处的配置文件
2.当前Ansible项目目录中的ansible-navigator.yml文件
3.~/.ansible-navigator.yml文件(主目录中)。请注意,其文件名开头有一个“点”

#与Ansible配置文件一样,每个项目都可以有自己的自动化内容导航器设置文件

#创建导航器配置文件
[student@workstation ~]$ rpm -ql ansible-navigator | grep temp
[student@workstation ~]$ vim /usr/lib/python3.9/site-packages/ansible_navigator/package_data/settings-sample.template.yml
2.配置自动化内容导航器
[student@workstation ~]$ vim ~/.ansible-navigator.yml
---
ansible-navigator:
  execution-environment:
    image: utility.lab.example.com/ee-supported-rhel8:latest
    pull:
      policy: missing    # 容器镜像下载策略 missing系统里有就不下载,否则下载

$ vim ~/.ansible-navigator.yml
  ---
ansible-navigator:
  execution-environment:
    image: utility.lab.example.com/ee-supported-rhel8:latest
    pull:
      arguments:
      - "--tls-verify=false"
      policy: missing
  playbook-artifact:
    enable: false   #关闭运行playbook时生成日志 执行剧本所产生的日志,执行一次记录一次
2.3.5 ansible的远程连接
#anisble远程连接时的必要条件
1.配置链接:如何选择远程的用户
2.清单位置:相对路径、绝对路径、多清单等。
3.链接设置: remote_user= ,~/.ansible-navigator.yml中playbook-artifact:
4.ssh免密:  ssh-key-gen,ssh-copy-id
5.升级特权: visudo,/etc/sudoers
3 编写和运行Playbook
Play是针对清单中选定的主机运行的一组有序任务
Playbook是一个文本文件,其中包含由一个或多个按特定顺序运行的play组成的列表
临时命令可以作为一次性命令对一组目标主机运行一项简单的任务
Playbook可以通过轻松重复的方式对一组目标主机执行多项复杂的任务
3.1 Playbook-yaml语法
1.playbook是使用YAML语法编写的文本文件,格式为.yml
2.严格缩进,空格
3.YAML文件以—开头,…. 结束,可以省略
4.使用”-“(减号加一个或多个空格)作为列表项
5.#注释
$ ansible-doc -l | grep yum
$ ansible-doc yum #进入之后,搜索/EXAMPLE
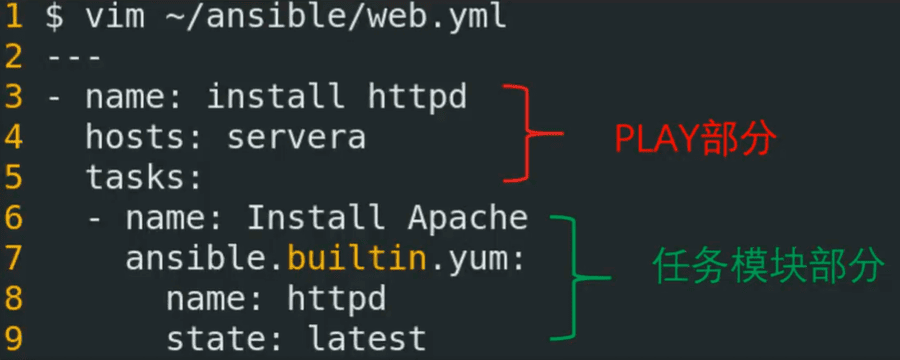
$ vim ~/ansible/web.yml
--- #yaml语法,---开头
- name: install httpd #play任务的描述:描述部分name字段是可选的选项
hosts: servera #主机模式:任务目标主机
tasks: #任务列表:下面通常为任务模块,有两格缩进
- name: Install Apache #任务模块:注意和tasks有两格缩进,name是可选字段,模块描述
ansible.builtin.yum: #模块名称:
name: httpd #模块选项1
state: latest #模块选项23.2 关闭运行playbook时的日志
[student@workstation ansible]$ vim ~/.ansible-navigator.yml
---
ansible-navigator:
  execution-environment:
    image: utility.lab.example.com/ee-supported-rhel8:latest
    pull:
      policy: missing
  playbook-artifact:
    enable: false  #关闭playbook时生成的日志
3.3 调整tab键缩进
整体缩进–方便对齐yaml语法文本缩进
vim ~/.vimrc
set tabstop=2    #将vim的tab键缩进调至两格
set nu             #设置行号
set autoindent   #回车时调整至上一行文本缩进
set cursorcolumn #设置竖坐标线 简写set cuc
set cursorline   #设置横坐标线 简写set cul

:set all        #末行模式下set all 查看所有环境设置帮助

#整体缩进 视图模式
ctrl+v , jjj(+G) ,I,(空格、空格),esc

#分解:
1.光标放在需要调节的行上
2.按ctrl+v,用方向键或G选定需要调节的列
3.输入I进入插入模式
4.空格空格,调节需要的缩进
5.按esc同步所有列
3.4 查找用于任务的模块
用Ansible进行部署任务时,可针对管理员任务需求,选择对应功能模块,通过以下方法可以查询模块帮助,以便编写临时命令及playbook
-RHEL<=8
[student@workstation ansible]$ ansible-doc -l
[student@workstation ansible]$ ansible-doc -l | grep yum
yum                                            Manages packages with the `y...
yum_repository                                 Add or remove YUM repositori...

# 查看某个模块的帮助
[student@workstation ansible]$ ansible-doc yum

-RHEL=9
$ ansible-navigator collections
$ ansible-navigator doc ansible.posix.firewalld
$ ansible-navigator doc ansible.posix.firewalld -m stdout

[student@workstation ansible]$ ansible-navigator collections -m stdout | grep firewalld
3.5 运行Playbook
运行前检查语法错误或执行空运行:
1.检查语法错误 ansible-navigator run web.yml –syntax-check file.yml
2.执行空运行 ansible-navigator run web.yml -C
通常直接运行ansible-navigator run web.yml进入交互模式或添加-m stdout可将任务打印到标准输出
#运行playbook
$ ansible-navigator run web.yml    # 交互式
$ ansible-navigator run web.yml -m stdout  # 非交互式
3.6 实施多个Play
1.Playbook是一个YAML文件,含有由一个或多个play组成的列表
2.如果一个playbook中含有多个 play,每个play可以将其任务应用到单独的一组主机
3.编排涉及对不同主机执行不同任务的复杂部署时会大有帮助
4.可以这样编写playbook:对一组主机运行一个play,完成后再对另一组主机运行另一个pla
5.Playbook中的各个play编写为playbook中的顶级列表项
3.6.1 编写多个Play
[student@workstation ansible]$ vim install_yum.yml
---
- name: install yum repo
  hosts: servera,serverb
  - name: AppStream_REPO
    ansible.builtin.yum_repository:
      name: Red Hat Enterprise Linux 9 for x86_64 - AppStream (RPMs)
      description: AppStream
      file: rhel_AppStream
      baseurl: http://content.example.com/rhel9.0/x86_64/dvd/AppStream
      gpgcheck: no

- name: install yum repo
  hosts: serverc
  tasks:
  - name: BaseOS_REPO
    ansible.builtin.yum_repository:
      name: Red Hat Enterprise Linux 9 for x86_64 - BaseOS (RPMs)
      description: BaseOS
      file: rhel_BaseOS
      baseurl: http://content.example.com/rhel9.0/x86_64/dvd/BaseOS
      gpgcheck: no

#ansible-navigator collections,ansible-navigator doc  ansible.posix.firewalld -m stdout
[student@workstation ansible]$ ansible-navigator collections -m stdout | grep firewalld
[student@workstation ansible]$ ansible-navigator doc ansible.posix.firewalld -m stdout

--syntax-check
[student@workstation ansible]$ ansible-navigator run install_yum.yml -m stdout --syntax-check
playbook: /home/student/ansible/install_yum.yml

-v -vv -vvv
[student@workstation ansible]$ ansible-navigator run install_yum.yml -m stdout --syntax-check -v


[student@workstation ansible]$ ansible-navigator run install_yum.yml -m stdout

# 测试运行剧本后的结果
[student@workstation ansible]$ ansible -m shell all -a 'yun -y install ftp'
[student@workstation ansible]$ ansible all -m shell -a 'rpm -q ftp'

# 用ansible-doc查询所有模块
yum        安装软件
service    管理服务
shell模块  管理防火墙
copy       拷贝,1有拷贝功能,2 可以将一段文本,复制到某个文件中,如文件不存在,则生成文件。
uri        网站连接测试
3.6.2 选择模块
| 类别 | 模块 |
|---|---|
| 文件 | ansible.builtin.copy: 将本地文件复制到受管主机 ansible.builtin.file: 设置文件的权限和其他属性 ansible.builtin.lineinfile: 确保特定行是否在文件中 ansible.posix.synchronize: 使用rsync 同步内容 |
| 软件 | ansible.builtin.package: 使用操作系统自带的自动检测软件包管理器管理软件包。 ansible.builtin.dnf: 使用DNF软件包管理器管理软件包 ansible.builtin.apt: 使用APT 软件包管理器管理软件包 ansible.builtin.pip: 从PyPI管理Python 软件包。 |
| 系统 | ansible.posix.firewalld: 使用firewalld 管理任意端口和服务 ansible.builtin.reboot: 重新启动计算机。 ansible.builtin.service: 管理服务 ansible.builtin.user: 添加、删除和管理用户帐户 |
| 网络工具 | ansible.builtin.get_url: 通过HTTP、HTTPS或FTP 下载文件 ansible.builtin.uri: 与Web 服务交互 |
4 管理变量
4.1 变量概述
4.1.1 Ansible变量简介
Ansible支持利用变量来存储值,并在Ansible项目的所有文件中重复使用这些值
可以简化项目的创建和维护,并减少错误的数量
# key:vaule
# 变量可以重复的应用到项目中,简化管理,应用对象可以是:
1.要创建的用户
2.要安装的软件包
3.要重新启动的服务
4.要删除的文件
5.互联网的文档等
4.1.2 命名变量
变量名称必须以字母开头,并且只能含有字母、数字和下划线
| 无效变量名称 | 有效变量名称 |
|---|---|
| web server | web_server |
| remote.file | remote_file |
| 1st file | file_1,file1 |
| remoteserver $1 | remote_server_1,remote_server1 |
4.2 定义变量
可在Ansible项目中的多个位置定义变量
如果在两个位置设置了同名变量,并且变量值不同,则通过优先级来决定要使用哪个值
可以设置会影响一组主机的变量,也可以设置只会影响个别主机的变量
有些变量是Ansible可以根据系统配置来设置的事实
有些变量可在playbook中设置,然后影响该playbook中的一个play,或者仅影响该play中的一项任务
可通过–extra-vars或-e选项并指定变量值
Ansible的变量可以定义在不同位置,根据需要设定,其中也有优先度
| 应用场景 | 描述 | 优先度 |
|---|---|---|
| 全局范围 | 命令行执行临时命令时指定的变量 -e key=vaule | 高 |
| play范围 | playbook的Play部分或模块内部指定变量信息key: vaule | 中 |
| 主机范围 | 清单中主机或主机组指定变量(主机 优先 主机组) | 低 |
4.2.1 全局范围-命令行
清单变量可被playbook中设置的变量覆盖,这两种变量又可通过在命令行中传递参数到ansible-navigatorrun 命令来覆盖
在命令行上设置的变量称为额外变量
#命令行使用变量优先级最高
[student@workstation ansible]$ ansible servera -m shell -a whoami -e ansible_user=root -e ansible_password=redhat
servera | CHANGED | rc=0 >>
root

#在执行playbook时指定变量
[student@workstation ansible]$ ansible-navigator run install_yum.yml -m stdout -e ansible_user=root -e ansible_password=redhat
4.2.2 PlAY范围-Playbook
变量在Ansible Playbook中发挥着重要作用,可以简化playbook中变量数据的管理
编写play时,可以定义自己的变量,然后在任务中调用这些值
例如,可以使用值httpd来定义名为web_package的变量,任务可以使用ansible.builtin.dnf模块调用该变量来安装httpd软件包
#playbook中可以在play位置使用vars直接定义变量,也可以通过vars_files加载包含变量的文件。
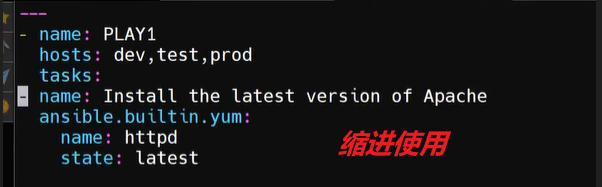
#1.在playbook的play部分使用vars直接定义变量
-vars
[student@workstation ansible]$ vim web.yml
---
- name: PLAY1
hosts: servera
vars: #vars关键字就是在playbook中设置自定义变量
- package: httpd #key:vaule 键值间:冒号隔开,冒号后有一个空格
tasks:
- name: install {{ package }}
ansible.builtin.yum:
name: "{{ package }}" #使用变量时,变量两边有空格,并且用双大括号括起来,变量开头要加“”双引号,非变量开头不用加双引号
state: latest
[student@workstation ansible]$ ansible-navigator run web.yml -m stdout --syntax-check
playbook: /home/student/ansible/web.yml
[student@workstation ansible]$ ansible-navigator run web.yml -m stdout
#2.生成变量文件
-vars_files
[student@workstation ansible]$ vim /home/student/ansible/var.yml
---
package: httpd #定义变量
[student@workstation ansible]$ vim /home/student/ansible/httpd.yml
---
- name: PLAY2
hosts: serverb
vars_files:
- /home/student/ansible/var.yml #vars_files 加载变量文件到剧本中
tasks:
- name: install {{ package }}
ansible.builtin.yum:
name: "{{ package }}"
state: latest
[student@workstation ansible]$ ansible-navigator run httpd.yml -m stdout --syntax-check
playbook: /home/student/ansible/httpd.yml
[student@workstation ansible]$ ansible-navigator run httpd.yml -m stdout4.2.3 主机范围-清单中
直接应用于主机的清单变量分为两大类:
1.主机变量:应用于特定主机
2.组变量:应用于一个主机组或组主机组中的所有主机。
主机变量优先于组变量,但playbook中定义的变量的优先级比这两者更高
若要定义主机变量和组变量,一种方法是直接在清单文件中定义
[student@workstation ansible]$ vim /home/student/ansible/inventory
172.25.250.9 ansible_password=redhat #给主机定义变量
[test]
172.25.250.10
[test:vars] #主机组变量中vars是固定语法
ansible_password=redhat #给主机组定义变量
[prod]
172.25.250.[11:12]
[balancers]
172.25.250.13
[all:vars] #给所有主机和主机组组定义变量
ansible_user=root
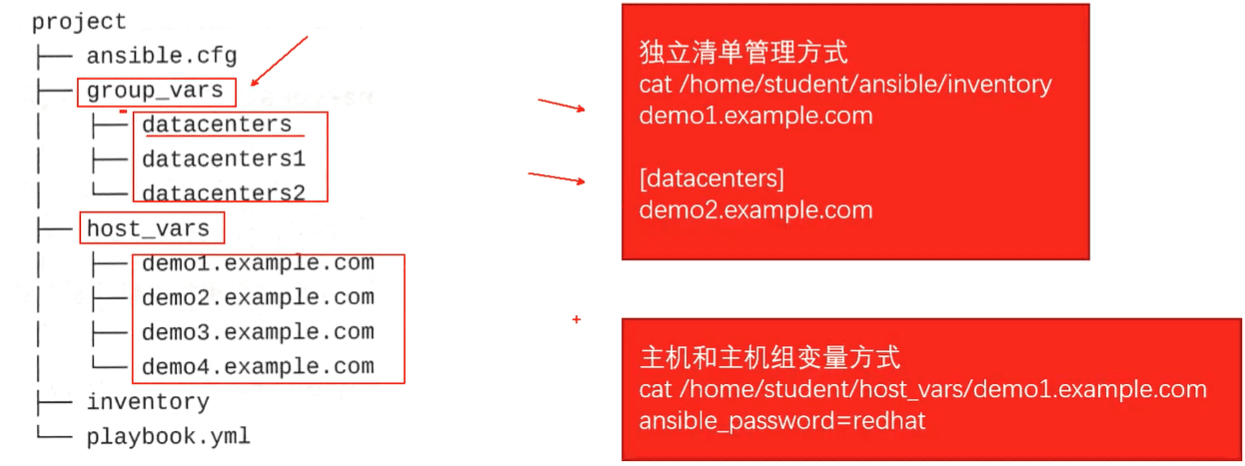
ansible_password=redhat 4.2.4 目录填充主机和组变量
定义主机和主机组变量的首选做法是在清单文件或目录相同的工作目录中创建group_vars和host_vars两个目录,这两个目录分别包含用于定义组变量和主机变量文件
建议在host_vars和group_vars目录定义清单变量,而不是直接在清单文件中定义它们
4.3 字典形式表示变量
除了将与同一元素相关的配置数据分配到多个变量外,管理员也可以使用字典
字典是一个包含键值对的数据结构,其中的值也可以是字典
vim vari.yml
---
users:
  user1:
    A_name: zhang
    B_name: san
    C_name: /home/zhangsan
  user2:
    A_name: li
    B_name: si
    C_name: /home/lisi
4.4 调用变量
#方法1:
  users.user1.A_name
  users.user2.B_name

#方法2:
  应用方法2:python字典
  users['user1']['A_name']

# [student@bastion ansible]$ vim user.yml
---
- name: useradd
  hosts: dev
  vars_files:
  - vari.yml
  tasks:
  - name: Add the user
    ansible.builtin.user:
      name: "{{ users.user1.A_name }}{{ users.user1.B_name }}"
      home: "{{ users['user1']['C_name'] }}"
4.5 已注册变量捕获命令输出
register用来捕获命令输出或有关模块执行的其他信息,输出会保存至一个变量中
$ vim register.yml
---
- name: install a packages
  hosts: servera
  tasks:
  - name: install the latest version of Apache
    ansible.builtin.yum:
      name: httpd
      state: latest
    register: install_result  #register字段负责收集变量 install_result自定义变量名被收集变量名
  - name:  message
    ansible.builtin.debug:
      var: install_result     #debug模块var选项打印register获取install_result变量值

#验证
$ ansible-navigator run -m stdout register.yml
5 管理机密-vault
5.1 介绍Ansible-vault
Ansible可能需要访问密码或API密钥等敏感数据,以配置受管主机
通常信息会以纯文本形式存储在清单变量或其他Ansible文件中。但若如此,任何有权访问Ansible文件的用户或存储这些Ansible文件的版本控制系统都能够访问此敏感数据,这显然存在安全风险
使用Ansible的Ansible Vault可以加密和解密任何由Ansible使用的数据文件
可通过一个名为ansible-vault的命令行工具创建、编辑、加密、解密和查看文件
Ansible Vault可以加密任何由Ansible使用的数据文件,这可能包括清单变量、playbook中含有的变量文件、在执行playbook时作为参数传递的变量文件或者Ansible角色中定义的变量
[student@workstation ~]$ ansible-vault --help
usage: ansible-vault [-h] [--version] [-v] {create,decrypt,edit,view,encrypt,encrypt_string,rekey} ...
encryption/decryption utility for Ansible data files
positional arguments:
  {create,decrypt,edit,view,encrypt,encrypt_string,rekey}
    create              Create new vault encrypted file     #创建密码文件
    decrypt             Decrypt vault encrypted file        #解密现有密码文件
    edit                Edit vault encrypted file           #编辑现有密码文件
    view                View vault encrypted file           #查看加密文件
    encrypt             Encrypt YAML file                   #加密现有文件
    encrypt_string      Encrypt a string
    rekey               Re-key a vault encrypted file       #更改加密文件的密码
5.2 创建与查看加密文件
#创建加密文件-create
[student@workstation ansible]$ ansible-vault create sec1.txt   #默认sec1.txt不存在,通过该命令生成
New Vault password: redhat
Confirm New Vault password: redhat

[student@workstation ansible]$ cat sec1.txt

#查看加密文件-view
[student@workstation ansible]$ ansible-vault view sec1.txt
Vault password: redhat
---
This is a encrypted file!
5.3 编辑现有的加密文件
#编辑加密文件-edit
[student@workstation ansible]$ pwd
/home/student/ansible

[student@workstation ansible]$ ansible-vault edit sec1.txt
Vault password:
[student@workstation ansible]$ ansible-vault view sec1.txt
Vault password:
---
This is a encrypted file!
password: redhat321
5.4 加密现有的文件
[student@workstation ansible]$ echo China > sec2.txt   #创建文件
[student@workstation ansible]$ cat sec2.txt
China

#加密现有文件-encrypt
[student@workstation ansible]$ ansible-vault encrypt sec2.txt
New Vault password: redhat
Confirm New Vault password: redhat
Encryption successful

[student@workstation ansible]$ cat sec2.txt

[student@workstation ansible]$ ansible-vault view sec2.txt
Vault password:
China
5.5 解密现有的文件
#解密现有的文件-decrypt
[student@workstation ansible]$ pwd
/home/student/ansible
[student@workstation ansible]$ ansible-vault decrypt sec2.txt
Vault password: redhat
Decryption successful
[student@workstation ansible]$ cat sec2.txt
China
5.6 更改加密文件的密码
#更改加密文件的密码-rekey
[student@workstation ansible]$ pwd
/home/student/ansible

[student@workstation ansible]$ ansible-vault rekey sec1.txt
Vault password: redhat                  #旧密码 redhat
New Vault password: redhat321           #新密码 redhat321
Confirm New Vault password: redhat321   #重复新密码 redhat321
Rekey successful

[student@workstation ansible]$ ansible-vault view sec1.txt
Vault password: redhat321
---
This is a encrypted file!
password: redhat321
5.7 使用密码文件
#查看帮助
[student@workstation ansible]$ pwd
/home/student/ansible

[student@workstation ansible]$ ansible-vault view sec1.txt --help
---省略---
  --vault-id VAULT_IDS  the vault identity to use
  --ask-vault-password, --ask-vault-pass  ask for vault password
  --vault-password-file VAULT_PASSWORD_FILES, --vault-pass-file VAULT_PASSWORD_FILES
                        vault password file
---省略---

[student@workstation ansible]$ echo redhat321 > secret.txt  #创建密码文件
[student@workstation ansible]$ cat secret.txt
redhat321
[student@workstation ansible]$ ansible-vault view sec1.txt --vault-id=secret.txt   #通过变量文件指定密码
---
This is a encrypted file!
password: redhat321
5.8 密码文件记录到ansible.cfg配置文件
密码文件记录在ansible.cfg配置文件中的好处是,当执行一个使用了加密文件的playbook时,不必手工指定加密文件密码
[student@workstation ansible]$ vim ansible.cfg          #第一次填写vault路径时,搜索`vault`关键字找该选项
vault_password_file=/home/student/ansible/secret.txt    #配置文件中指定密码文件位置

[student@workstation ansible]$ ansible-vault view sec1.txt    #自动调用配置文件中密码文件
---
This is a encrypted file!
password: redhat321

#密码文件记录在配置文件中后
1.加密现有文件时会直接引用
[student@workstation ansible]$ ansible-vault encrypt sec2.txt
Encryption successful

2.更改密码时会直接覆盖
[student@workstation ansible]$ ansible-vault rekey sec2.txt
Rekey successful

3.更改密码需使用--ask-vault-password参数指定
[student@workstation ansible]$ ansible-vault rekey sec2.txt --ask-vault-password
Vault password: redhat
New Vault password: redhat
Confirm New Vault password: redhat
Rekey successful
6 管理事实facts
Ansible事实是Ansible在受管主机上自动检测到的变量
事实中含有与主机相关的信息,可以像play中的常规变量、条件、循环或依赖于从受管主机收集的值的任何其他语句那样使用
为受管主机收集的一些事实可能包括:主机名称、内核版本、网络接口名称、网络接口IP地址、操作系统版本、CPU数量提供的或可用的内存、存储设备的大小和可用空间
借助事实可以方便地检索受管主机的状态,并根据该状态确定要执行的操作。例如:
1.根据含有受管主机当前内核版本的事实运行条件任务,以此来重新启动服务器
2.根据通过事实报告的可用内存来定义MySQL配置文件
3.根据事实的值设置配置文件中使用的IPv4地址
每个play在执行第一个任务之前会先自动运行setup模块来收集事实,这在Ansible2.3中报告为GatheringFacts任务或者更早版本中报告为setup。默认情况下,无需具有在play中运行setup的任务,通常会自动运行
查看受管主机收集的事实的方式是:
1.使用ad-hoc命令运行setup模块
2.使用playbook运行debug模块并提取变量var: ansible facts
6.1 收集事实
# 收集事实常用两种手段常用是临时命令ad-hoc及Playbook,事实以josn语法格式列出。收集时要找ansible_开头的事实名称
# 如果变量值为散列/字典,则可以用两种语法来检索该值:
ansible_default_ipv4.hostname
ansible_default_ipv4.[ 'hostname' ]
6.1.1 临时命令 ad-hoc
1.使用ad-hoc方式收集事实
[student@workstation ansible]$ ansible -m setup all  #收集清单中所有主机的事实
[student@workstation ansible]$ ansible -m setup servera -a filter=ansible_nodename  #过滤

[student@workstation ansible]$ ansible -m setup serverc -a filter=*ipv4*    #过滤&模糊匹配

[student@workstation ansible]$ ansible -m setup serverc > fact.txt   #将事实记录到fact.txt文件中,方便查找
6.1.2 PLAYBOOK 收集事实
[student@workstation ansible]$ vim debug.yml
---
- name: debug
  hosts: servera
  tasks:
  - ansible.builtin.debug:
  #简化后可将ansible_facts去掉,二级变量开头,要保留ansible_,如:ansible_default_ipv4.address
      msg: servera ip address "{{ ansible_default_ipv4.address }}"
  - ansible.builtin.debug:
      var: ansible_hostname
[student@workstation ansible]$ ansible-navigator run debug.yml -m stdout --syntax-check
playbook: /home/student/ansible/debug.yml

[student@workstation ansible]$ ansible-navigator run debug.yml -m stdout
6.1.3 关闭事实
[student@workstation ansible]$ vim debug.yml
---
- name: debug message
  hosts: dev
  gather_facts: on/off  true/false   # 是否关闭事实
  tasks:
  - debug:
      msg: "{{ ansible_facts.default_ipv4.address }}"

[greg@bastion ansible]$ ansible-playbook debug.yml

#如果playbook内容和事实收集没有关系,关闭可以大量减少playbook执行时间
6.2 魔法变量
实时变量通常收集的是受管节点的信息,而魔法变量收集的是本机的变量值
#inventory_hostname  列出组在清单中的主机名
[student@workstation ansible]$ ansible web -m debug -a var=inventory_hostname

#group_names     列出当前主机归属于哪个组
[student@workstation ansible]$ ansible serverd -m debug -a var=group_names

#groups    列出清单中的所有主机名称。以及所在组
[student@workstation ansible]$ ansible all -m debug -a var=groups

#hostvars  列出系统中所有魔法变量及所有事实变量
[student@workstation ansible]$ ansible all -m debug -a var=hostvars

$ https://docs.ansible.com/ansible/latest/reference_appendices/special_variables.html  #官网文档
# dosc.ansible.com中搜索magic或facts
6.2.1 临时命令收集魔法变量值 ad-hoc
ansible  servera -m debug -a var=inventory_hostname
ansible  servera -m debug -a var=groups
ansible  all -m debug -a var=group_names
ansible  all -m debug -a var=hostvars
ansible  servera -m debug -a var=groups.all
6.2.2 PLAYBOOK收集事实+魔法变量
[student@workstation ansible]$ vim hoc_debug.yml
---
- name: debug
  hosts: servera
  gather_facts: on
  tasks:
  - ansible.builtin.debug:
     var: hostvars

[student@workstation ansible]$ ansible-navigator run hoc_debug.yml -m stdout --syntax-check
playbook: /home/student/ansible/hoc_debug.yml

[student@workstation ansible]$ ansible-navigator run hoc_debug.yml -m stdout

#重定向到文件中的意义是方便在hoc_fact.txt文件中搜索需要的值
[student@workstation ansible]$ ansible-navigator run hoc_debug.yml -m stdout > hoc_fact.txt
6.2.3 魔法变量hostvars
临时命令与playbook收集hostvars变量值是不同的
临时命令不会执行setup模块,所以收集不到事实,PLAYBOOK方法则可以收集到事实和魔法变量
[student@workstation ansible]$ ansible all -m setup > all_host.txt7 实施任务控制
7.1 利用循环迭代任务
利用循环,管理员无需编写多个使用同一模块的任务
Ansible支持使用loop关键字对一组项目迭代任务,可以配置循环以利用列表中各个项目、列表中各个文件的内容、生成的数字序列或更为复杂的结构来重复任务
#loop字段通常在同一缩进的模块下面,对该模块生效,通过item来加载loop循环中的值或变量
#帮助:搜索loop可以搜到相应语法
$ https://docs.ansible.com/ansible/latest/user_guide/playbooks_loops.html
7.1.1 简单循环
简单循环对一组项目迭代任务
loop 关键字添加到任务中,将应对其迭代任务的项目列表取为值
循环变量item保存每个迭代过程中使用的值
[student@workstation ansible]$ vim loop.yml
---
- name: service
  hosts: servera
  tasks:
  - name: Start service nfs-server&chronyd
    ansible.builtin.service:
      name: "{{ item }}"
      state: started
    loop:
    - nfs-server
    - chronyd

[student@workstation ansible]$ ansible-navigator run loop.yml -m stdout --syntax-check
playbook: /home/student/ansible/loop.yml

[student@workstation ansible]$ ansible-navigator run loop.yml -m stdout
7.1.2 循环使用变量
在playbook中通过vars或vars files方式加载变量servers中包含循环列表,模块通过loop字段加载servers变量列表中的值
# vars字段
[student@workstation ansible]$ vim loop.yml
---
- name: service loop
  hosts: servera
  vars:
    servers:
    - nfs-server
    - chronyd
  tasks:
  - name: Start service
    ansible.builtin.service:
      name: "{{ item }}"
      state: stopped
    loop: "{{ servers }}"

# vars字段也可以替换为vars_files,将变量保存至文件中,加载到Playbook
[student@workstation ansible]$ mkdir /home/student/ansible/vars/
[student@workstation ansible]$ vim /home/student/ansible/vars/var.yml
servers:
- nfs-server
- chronyd

[student@workstation ansible]$ vim loop.yml
---
- name: service loop
  hosts: servera
  vars_files:
    - /home/student/ansible/vars/var.yml
  tasks:
  - name: Start service
    ansible.builtin.service:
      name: "{{ item }}"
      state: stopped
    loop: "{{ servers }}"
[student@workstation ansible]$ ansible-navigator run loop.yml -m stdout --syntax-check
playbook: /home/student/ansible/loop.yml

[student@workstation ansible]$ ansible-navigator run loop.yml -m stdout
7.1.3 循环字典列表
1.循环字典列表保存在loop字段中
[student@workstation ansible]$ vim loop.yml
---
- name: service loop
  hosts: servera
  tasks:
  - name: Start service
    ansible.builtin.user:
      name: "{{ item.name }}"
      comment: "{{ item.comment }}"
      state: present
    loop:
      - name: jane
        comment: tom
      - name: joe
        comment: harry

[student@workstation ansible]$ ansible-navigator run loop.yml -m stdout --syntax-check
playbook: /home/student/ansible/loop.yml

[student@workstation ansible]$ ansible-navigator run loop.yml -m stdout
2.循环字典列表保存在play的vars中
[student@workstation ansible]$ vim loop.yml
---
- name: service loop
  hosts: servera
  vars:
    users:
    - name: jane
      comment: tom
    - name: joe
      comment: harry
  tasks:
  - name: Start service
    ansible.builtin.user:
      name: "{{ item.name }}"
      comment: "{{ item.comment }}"
      state: present
    loop: "{{ users }}"

[student@workstation ansible]$ ansible-navigator run loop.yml -m stdout --syntax-check
playbook: /home/student/ansible/loop.yml

[student@workstation ansible]$ ansible-navigator run loop.yml -m stdout
3.循环字典列表保存在play的vars_files中
[student@workstation ansible]$ vim /home/student/ansible/vars/var.yml
servers:
users:
- name: jane
  comment: tom
- name: joe
  comment: harry

[student@workstation ansible]$ vim loop.yml
---
- name: service loop
  hosts: servera
  vars_files:
  - /home/student/ansible/vars/var.yml
  tasks:
  - name: Start service
    ansible.builtin.user:
      name: "{{ item.name }}"
      state: present
      comment: "{{ item.comment }}"
    loop: "{{ users }}"

 [student@workstation ansible]$ ansible-navigator run loop.yml -m stdout --syntax-check
playbook: /home/student/ansible/loop.yml

[student@workstation ansible]$ ansible-navigator run loop.yml -m stdout
7.2 有条件地运行任务

使用conditionals在符合特定条件时运行任务或play
条件句可帮助区分不同的受管主机,并根据所符合的条件来分配功能角色
Playbook变量、注册的变量和Ansible事实都可通过条件句来进行测试,可以使用比较字符串、数字数据和布尔值的运算符
1.通常主机模式为多个节点时,可以让符合when条件的主机执行模块任务。符合条件则为真,则执行模块。否则为假,跳过模块任务
when判断对象是模块,和模块在同一下列层次
when判断当前模块是否执行,而不是它下面模块是否执行
When中引用变量、facts,不需加大括号
用于测试条件中相等的==运算符不可与变量赋值的=运算符混淆
2.一个when语句可用于评估多个值。 可以使用and和or关键字组合条件,或使用括号分组条件
1.or是或的关系,任意一个条件为真即可
when: ansible_distribution == "RedHat" or ansible_distribution == "Fedora"

2.and是与的关系,多个条件需同时为真
when: ansible_distribution version == "7.5" and ansible_kernel == "3.10.0-327.el7.x86_64"

3. When语句多条件的另外方式:
when:
   -ansible_distribution_version == "7.5"
   -ansible_kernel == "3.10.0-327.el7.x86_64"
4.使用括号分组条件来表达更复杂的条件语句:
when:  >
   ( ansible_distribution == "RedHat" and
     ansible_distribution_major_version == "7")
   or
    ( ansible_distribution == "Fedora" and
      ansible_distribution_major_version == "28")
7.2.1 简单的有条件任务
[student@workstation ansible]$ vim when.yml
---
- name: repository
  hosts: all
  tasks:
  - name: install the latest version of Apache
    ansible.builtin.yum:
      name: httpd
      state: latest
    when: ansible_default_ipv4.address == '172.25.250.10'

[student@workstation ansible]$ ansible-navigator run when.yml -m stdout --syntax-check
playbook: /home/student/ansible/when.yml

[student@workstation ansible]$ ansible-navigator run when.yml -m stdout

#如果使用inventory_hostname这个魔法变量,要参考清单中的主机名称。node1位置,单双引号都可以识别为字符串
7.2.2 组合循环和有条件任务
[student@workstation ansible]$ vim when_loop.yml
---
- name: 安装软件包
  hosts: all
  tasks:
  - name: install the latest version of Apache
    ansible.builtin.yum:
      name: "{{ item }}"
      state: latest
    loop:
    - php
    - mariadb
    when: ansible_hostname == 'servera' or ansible_hostname == 'serverc'

[student@workstation ansible]$ ansible-navigator run when_loop.yml -m stdout --syntax-check
playbook: /home/student/ansible/when_loop.yml
[student@workstation ansible]$ ansible-navigator run when_loop.yml -m stdout
7.2.3 常用when条件语句
[student@workstation ansible]$ ansible all -m debug -a var=groups
[student@workstation ansible]$ ansible all -m debug -a var=group_names
#变量值 == '字符串'
inventory_hostname == 'node1'
inventory_hostname != 'node1'
'"52:54:00:00:fa:0b" in ansible_default_ipv4.macaddress'
ansible_default_ipv4.address == '172.25.250.11'

#变量值存在  in  第二个变量
inventory_hostname in groups.dev    #可以匹配组
'"dev" in group_names'              #可以匹配
[student@workstation ansible]$ vim when_loop3.yml
---
- name: repository
  hosts: all
  tasks:
  - name: install the latest version of Apache
    ansible.builtin.yum:
      name: httpd
      state: latest
    when: '"db" in group_names'
[student@workstation ansible]$ ansible-navigator run when_loop3.yml -m stdout --syntax-check
playbook: /home/student/ansible/when_loop3.yml
[student@workstation ansible]$ ansible-navigator run when_loop3.yml -m stdout

#default变量查询方法
#搜索引擎中搜索:filters --- Using filters to --- 搜索admin---default('admin', true)
8 实施处理程序
handlers是处理程序的一种实现,当对一个Playbook模块改动时,通过监控发现改动,并自动执行后续处理动作
比如一种场景,当修改了服务配置文件时,需要对服务进行重启,可以在配置文件模块位置用notify监视是否修改后,用handlers中的处理程序如:service模块对其重启服务,达到修改文件便自动重启服务的效果
8.1 Ansible处理程序
$ vim handlers.yml
---
- name:
  hosts: servera
  tasks:
  - name: install the latest version of Apache
    ansible.builtin.yum:
      name: httpd
      state: latest
  - name: Copy using inline content
    ansible.builtin.copy:
      content: 'heihei'
      dest: /var/www/html/index.html
    notify: restart            #notify字段冒号后的名称restart,指向handlers中的描述为restart的模块
  - name: Start firewalld
    ansible.builtin.service:
      name: firewalld
      state: started

  handlers:                            #handlers是缩进和tasks对齐
  - name: restart
    ansible.builtin.service:
      name: httpd
      state: restarted
8.2 执行中对错误的处理
Ansible评估各任务的返回代码,从而确定任务是成功还是失败
通常而言,当任务失败时,ansible将立即在该主机上终止play的其余部分并且跳过所有后续任务
有些时候,可能希望即使在任务失败时也继续执行play
8.2.1 ignore_errors
忽略任务失败 ignore_errors
[student@workstation ansible]$ vim ignore_errors.yml
---
- name: test error
  hosts: servera
  tasks:
  - name:  touch directory
    ansible.builtin.shell: mkdir /a/b
    ignore_errors: yes
  - name: Add the user
    ansible.builtin.user:
      name: johnd

[student@workstation ansible]$ ansible-navigator run ignore_errors.yml -m stdout --syntax-check
[student@workstation ansible]$ ansible-navigator run ignore_errors.yml -m stdout

#也可以在任务失败时强制执行处理程序,详见教材
---
- name: test error
  force_handlers: yes
  tasks:
  - xxxx

  handlers:
  - name: haha
    ansible.builtin.service:
    xxx
    xxx
8.3 Ansible块和错误的处理
8.3.1 block、rescue、always
block:定义要运行的主要任务
rescue:定义要在block子句中定义的任务失败时运行的任务
always:定义始终都在独立运行的任务
---
- name: block
  hosts: all
  tasks:
  - block:
    - name:
      ansible.builtin.yum:
        name: http
        state: present
    rescue:
    - name:
      ansible.builtin.yum:
        name: httpd
        state: present
    when: inventory_hostname == 'serverb'
    always:
    - name: Start service httpd, if not started
      ansible.builtin.service:
        name: httpd
        state: started
# Ansible官方文档:搜索:rescue https://docs.ansible.com/ansible/latest/user_guide/playbooks_blocks.html
8.3.2 block的使用
#未使用block时:
---
- name: test error
  hosts: all
  tasks:
  - name:  touch file
    ansible.builtin.shell: mkdir  -p /a/b
    when: inventory_hostname == "servera"

  - name: Add the user
    ansible.builtin.user:
      name: johnd
    when: inventory_hostname == "servera"

#使用block时
---
- name: test error
  hosts: all
  tasks:
  - block:
    - name:  touch file
      ansible.builtin.shell: mkdir  -p /a/b

    - name: Add the user
      ansible.builtin.user:
        name: johnd
    when: inventory_hostname == "servera"
9 文件部署到受管主机
9.1 将文件复制到主机
9.1.1 文件模块
1.在被管机上创建文件和目录
2.复制文件(或内容)到被管机 control –> node1
3.从被管机复制文件到管理机 node1 –> control
4.修改文件内容
5.查看文件状态
6.修改文件属性(所有者、权限、selinux)
7.文件同步
ansible.builtin-描述文件模块:
| 模块名 | 说明 |
|---|---|
| blockinfile | 插入、更新 、删除,自定义标记的多行文本块 |
| file | 设置权限、所有者、SElinux上下文及常规文件、符号连接、硬链接等 |
| copy | 远程copy,类似file,可以设置文件属性、SElinux上下文 |
| fetch | 和copy类似,相反工作方式,从远端拷贝到控制节点 |
| lineinfile | 改文件某一行时使用 |
| stat | 检测文件状态,类似linux中stat命令 |
| synchronize | 围绕rsync一个打包程序 |
#查找模块可使用命令
$ ansible-doc -l | grep file
$ ansible-navigator collections -m stdout | grep file$
$ ansible-doc file
#注意:很多模块已经不在ansible.builtin集合中了,所以需要通过ansible-navigator collections命令搜索。
1.ansible.builtin.file
- name: Change file ownership, group and permissions
  ansible.builtin.file:
    path: /var/www/html/index.html
    owner: apache
    group: apache
    mode: '0644'
    state: touch
    setype: default_t

#(Choices: absent, directory, file, hard, link, touch)[Default: file]
#file:修改文件内容,无该文件则不修改
#touch:创建文件
#touch,mkdir,cp,mv,rm,ln,chmod,chown,chcon
2.ansible.builtin.copy
#复制本机文件到受管节点
- name: Copy file with owner and permissions
  ansible.builtin.copy:
    src: /srv/myfiles/foo.conf
    dest: /var/www/html/index.html
    owner: foo
    group: foo
    mode: '0644'
    setype:  httpd_sys_content_t

#复制文本内容testweb至目标文件,文件不存在则创建
- name: Copy using inline content
  ansible.builtin.copy:
    content: "testweb"
    dest: /var/www/html/index.html
3.ansible.builtin.lineinfile
[student@workstation ansible]$ ansible-doc -l | grep line
lineinfile                                     Manage lines in text files
[student@workstation ansible]$ ansible-doc lineinfile
[student@workstation ansible]$ vim lineinfile.yml
---
- name: lineinfile
  hosts: all
  tasks:
  - name: Ensure SELinux is set to enforcing mode
    ansible.builtin.lineinfile:
      path: /etc/selinux/config
      regexp: '^SELINUX='
      line: SELINUX=enforcing

[student@workstation ansible]$ ansible-navigator run lineinfile.yml -m stdout --syntax-check
playbook: /home/student/ansible/lineinfile.yml

[student@workstation ansible]$ ansible-navigator run lineinfile.yml -m stdout

#验证:
[student@workstation ansible]$ ansible servera -m shell -a 'cat /etc/selinux/config'

#docs.ansible.com 搜索引擎中搜索:filters --- Using filters to --- 搜索admin---default('admin', true)
4.ansible.builtin.blockinfile
- name: Insert/Update HTML surrounded by custom markers after <body> line
  ansible.builtin.blockinfile:
    path: /opt/index.html
    marker: "<!-- {mark} ANSIBLE MANAGED BLOCK -->"
    insertafter: "<body>"
    block: |
      <h1>Welcome to {{ ansible_hostname }}</h1>
      <p>Last updated on {{ ansible_date_time.iso8601 }}</p>
5.ansible.builtin.template
- name: Template a file to /etc/files.conf
  ansible.builtin.template:
    src: /mytemplates/foo.j2
    dest: /etc/file.conf


- name: Download foo.conf
  ansible.builtin.get_url:   #该模块可以将网络上的文件,直接下载至受管节点上。
    url: http://materials/hosts.j2   #源文件
    dest: /opt/host.txt  #目标文件位置
9.2 Jinja2模板部署自定义文件
9.2.1 jinja2简介
ansible中使用jinja2模板对文件进行部署,再用template模块同步jinja2模板文件至受管节点,该模块和copy模块作用基本一样,都是把某个文件复制到被管主机上,但是区别在于template模块可以获取变量的值和使用循环
1.管理文件通常会使用一些模块,copy,file,blockinfile,lineinfile
2.更好的配置文件管理方式是使用jinja2语法制作模板文件来生成最终使用的配置文件
3.jinja2模板文件内,可以通过多种方式编辑或构成,比如魔法变量、事实变量、普通字符、控制语句语法…
4.使用jinja2模板的方法是,先构建jinja2模板,再通过template模块将j2模板同步至受管节点
5.构建模板文件通常名称自定义,以.j2结尾,类似shell脚本的.sh、python脚本的.Py
9.2.2 使用分隔符
1、构建jinja2模板
$ vim jin.j2  #文件名用.j2结尾
127.0.0.1   localhost localhost.localdomain localhost4 localhost4.localdomain4
::1         localhost localhost.localdomain localhost6 localhost6.localdomain6
{# host file #}    #描述,为管理员做提示作用。用户不可见
haha {{ ansible_hostname }}

2、通过templete模块,同步模板文件至受管主机,同时收集事实变量值,将结果生成至相应文件中。
$ vim temp.yml
---
- name: sync file
  hosts: servera
  tasks:
  - name: Template a file to /etc/files.conf
    ansible.builtin.template:
      src: jin.j2
      dest: /etc/myhosts
$ ansible-navigator run temp.yml -m stdout

3、在受管节点上查看文件结果
$ ansible servera -m shell -a 'cat /etc/myhosts'
servera | CHANGED | rc=0 >>
haha
servera heihei servera.lab.example.com
9.2.3 管理模板文件
1、在配置文件中定义ansible_managed功能,添加描述信息:“Ansible hahaha”
[greg@control ansible]$ vim ansible.cfg
[defaults]
ansible_managed = Ansible hahaha
变量名 =  变量值

2、在jinja2模板中调用该功能
#vim jinja.j2
{# host file #}     #{##}注释客户端生成文件是不显示
{{ ansible_managed }}  #{{}}描述,客户端生成文件时会显示
127.0.0.1   localhost localhost.localdomain localhost4 localhost4.localdomain4
::1         localhost localhost.localdomain localhost6 localhost6.localdomain6
9.2.4 控制结构-使用循环
-shell
for user in `ls /`;do
   echo $user
done

-jinja2
{% for user in users %}   #user变量替换为users变量中的所有值,一行一个值。
{{ user }}
{% endfor %}

#示例
$ vim jinja2.j2
{% for host in groups.all %}  #使用for 或if 时控制结构使用{% %}
{{ host }}
{% endfor %}

#查看语法帮助:官网或关键词搜索示例
[student@workstation ansible]$ grep -r '{%' /etc
1.文件的生成方法
$ vim debug.yml
---
- name:
  hosts: all
  tasks:
  - ansible.builtin.debug:
      var: hostvars
$ ansible-navigator run debug.yml  -m stdout > 1.txt
2.生成/etc/hosts
# 方法1:
$ vim /home/student/ansible/temp.yml
127.0.0.1 localhost localhost.localdomain localhost4 localhost4.localdomain4
::1 localhost localhost.localdomain localhost6 localhost6.localdomain6

{% for host in groups.all %}
{{ hostvars[host].ansible_default_ipv4.address }} {{ hostvars[host].ansible_nodename }} {{ hostvars[host].ansible_hostname }}
{% endfor %}

#方法2:
vim /home/student/ansible/temp.yml
---
- name: sync file
  hosts: all
  tasks:
  - name: Template a file to /etc/files.conf
    ansible.builtin.template:
      src: hosts.j2
      dest: /etc/myhosts
    when: inventory_hostname in groups.dev     #匹配dev组

$ ansible-navigator run temp.yml -m stdout
$ ansible  servera -m shell -a 'cat /etc/myhosts'

# 以json格式查看:
{{ hostvars[i]['ansible_facts'] |  to_nice_json }}
10 管理大项目
10.1 引用清单主机
10.1.1 使用主机模式的方式
#使用主机模式的常见方式:

1.[ad-hoc:]
ansible dev -m shell

2.[playbook:]
- name:
  hosts: dev
10.1.2 通配符匹配多个主机
# 清单里使用通配符匹配多个主机
[START:END]
192.168.[0:15].[0:255] 表示 192.168.0.0-192.168.15.255
server[a:c].example.com  表示   a-c
server[01:15].example.com  表示   server01.example.com-server15
ipv6也可以通过[a:f]这种方式
all: 所有主机
ungrouped : 不属于任何一个组的所有主机
10.1.3 主机模式其他方式
#使用特殊字符时,必须添加单引号,否则不生效
hosts: '*'  和all相同
hosts:'*.example.com'
hosts:'datacenter*'

#列表形式
hosts:servera,serverb
hosts:webserver,serverc
hosts:'devops,server*'

#冒号:取代逗号
hosts:lab,&datacenter 匹配lab组同时也属于datacenter组,顺序无所谓&符号时同时也属于的意思
hosts:datacenter,!test2.example.com  表示datacenter组,但不包括test2.。。这个主机
hosts:all,!datacenter1  所有组,但不包含datacenter1组
10.2 包含和导入文件
10.2.1 管理大型Playbook
# 如果playbook很长很复杂,可以拆分成较小的文件便于管理,以模块化管理
# 可以将多个不同功能的play,组合成一个主要的playbook,将文件中的任务列表插入play,这样可将这种模块化的play应用到不同场景
playbook
- httpd
- php
- mysql
10.2.2 导入Playbook
1.将两个playbook加入到主playbook
$ vim one.yml
---
- name: play1
  hosts: node1
  tasks:
  - name: Install the latest version of Apache
    ansible.builtin.yum:
      name: httpd
      state: latest

$ vim two.yml
---
- name: play2
  hosts: node1
  tasks:
  - name: Make sure a service unit is running
    ansible.builtin.systemd:
      state: started
      name: httpd
      enabled: yes


2.在主playbook中和其他play交替使用
$ vim main.yml
---
- name: four
  hosts: node1
  tasks:
  - ansible.builtin.debug:
      msg: haha

- name: one     # 因为加载的是playbook所以需要顶头写无缩进
  import_playbook: one.yml

- name: two
  import_playbook: two.yml
10.2.3 包含与导入
Ansible可以支持两种方法将文件放入playbook中:
包含:内容是一个动态操作。在playbook运行期间,Ansible会在内容到达时处理所包含的内容
导入:内容是一个静态操作。在运行开始之前,Ansible在最初解析playbook时预处理导入的内容
1.包含
1.使用include_tasks功能时,包含时设置的when等条件语句将确定任务是否包含在play中
2.如果运行ansible-playbook --list-tasks以列出playbook中的任务,则不会显示已包含任务文件中的任务。将显示包含任务文件的任   务。相比之下,import_tasks功能不会列出导入任务文件的任务,而列出已导入任务文件中的各个任务
  #([greg@control ansible]$ ansible-playbook playbook.yml --start-at-task webserver)
3.不能使用ansible-playbook --start-at-task从已包含任务文件中的任务开始执行playbook
  #([greg@control ansible]$ ansible-playbook playbook.yml --start-at-task webinstall)
4.不能使用notify语句触发已包含任务文件中的处理程序名称
  可以在包含整个任务文件的主playbook中触发处理程序,在这种情况下,已包含文件中的所有任务都将运行
2.导入
1.使用import_tasks功能时,导入时设置的when等条件语句将应用于导入的每个任务
2.无法将循环用于import_tasks功能
3.如果使用变量来指定要导入的文件的名称,则将无法使用主机或组清单变量
3.使用示例
第一个tasks任务
[greg@bastion ansible]$ mkdir tasks    #tasks目录是自定义的,创建的目的只是方便存储管理tasks任务文件。
[greg@bastion ansible]$ vim tasks/apache.yml  #tasks任务文件,文件中没有主机模式
---
- name:
  ansible.builtin.yum:
    name: httpd
    state: latest
第二个tasks任务
[greg@bastion ansible]$ vim tasks/service.yml
---
- name:
  ansible.builtin.service:
    name: httpd
    enabled: yes
    state: started

包含和导入的方式:
[greg@bastion ansible]$ vim main.yml   #此处main.yml是一个playbook,有主机模式
---
- name:
  hosts: node1
  tasks:
  - include_tasks: tasks/apache.yml
  - import_tasks: tasks/service.yml
11 角色和collections简化Playbook
11.1 描述角色结构
# Ansible中的角色是结构化的目录组成,可以根据业务需要创建不同的角色,apache的、mysql的等
# 角色的优势是类似将playbook分割成更小的模块,进行模块化管理,简化playbook
# 除了自行编写、使用、重用和共享角色外,也可以从其他来源获取角色以及使用分发包(如Ansible内容集合)查找角色
11.2 创建角色
# 在playbook的项目目录中创建一个角色,并将其作为playbook中某个play的一部分来运行
1.yum install -y httpd            yum模块
2.index.html, fcontext            copy模块
3.httpd service                   service模块
4.firewalld.service               service模块
5.firewalld permit apache         firewalld模块
# 使用web角色一键部署以上服务
创建和使用角色分四步进行:
1.创建角色目录存储路径
2.创建角色
3.定义角色内容
4.在playbook中使用角色
11.2.1 角色目录存储路径
# 配置ansible.cfg文件中的roles-path,默认ansible会在roles子目录中查找角色
# 可以将自己的角色安装在~/ansible/roles子目录中
1.默认路径:
[student@workstation ansible]$ ansible-galaxy --help

[student@workstation ansible]$ ansible-galaxy role --help    #查看角色的子命令帮助

[student@workstation ansible]$ ansible-galaxy role list     #新版本查看角色指令
[student@workstation ansible]$ ansible-galaxy list           #旧版本查看角色指令
# /usr/share/ansible/roles   -- 系统角色
# /etc/ansible/roles         -- 全局角色路径
[WARNING]: - the configured path /home/student/.ansible/roles does not exist.  --默认该目录不存在,需要的话可以根据需求创建
`如果ansible无法找到该位置角色,会按照ansible.cfg中roles_path指定的目录中查找`

2.创建角色目录存储路径
  使用自定义工作目录时,创建自定义roles(角色)目录,并使用ansible.cfg中roles_path=字段指定角色路径
[student@workstation ansible]$ pwd        #进入自己的工作目录
/home/student/ansible

[student@control ansible]$ mkdir roles    #创建存放角色的目录

[student@control ansible]$ vim ansible.cfg
roles_path=/home/student/ansible/roles    #指定角色路径

[student@workstation ansible]$ ansible-galaxy list  #要在工作目录中使用查看命令,调用当前工作目录配置文件中的角色路径
# /home/student/ansible/roles                       #查询结果应和配置文件的roles_path字段一致
11.2.2 创建角色
[student@workstation ansible]$ ansible-galaxy role init roles/apache    #创建角色
- Role roles/apache was created successfully

[student@workstation ansible]$ ansible-galaxy role list   #列出所有角色
# /home/student/ansible/roles
- apache, (unknown version)

[student@workstation ansible]$ tree roles/apache/
roles/apache
├── defaults                  #角色默认变量
│   └── main.yml
├── files                     #引用的静态文件,可以是一些文件、网页模板等
├── handlers                  #处理程序,通常通过模块完成的
│   └── main.yml
├── meta                      #作者,许可、兼容性
│   └── main.yml
├── README.md
├── tasks                     #任务,任务的组成就是模块应用,也是角色的主要功能
│   └── main.yml
├── templates                 #模板文件,通常使用jinja2模板
├── tests                     #测试
│   ├── inventory
│   └── test.yml
└── vars                      #角色变量
    └── main.yml

8 directories, 8 files
#用不到的目录可以删除,如defaults、vars、tests
11.2.3 定义角色内容
[student@control ansible]$ tree roles/apache (可选,方便查看路径信息)
*[student@control ansible]$ vim roles/apache/tasks/main.yml   #在tasks目录中完善角色内容
---
- name: install apache     #编写角色时,任务中只有模块任务,没有PLAY
  ansible.builtin.yum:
    name: httpd
    state: latest
- name: Start service httpd
  ansible.builtin.service:
    name: httpd
    state: started
    enabled: yes
- name: create web page
  ansible.builtin.template:
    src: jin2.j2    #jin2.j2需要手动创建
    dest: /var/www/html/index.html
  notify:
  - restart   #需要时将调用handlers处理程序,需要手动创建,restart通知中的处理程序名要和handlers/main.yml中处理程序描述一致
- name: Start service firewalld
  ansible.builtin.service:
    name: firewalld
    state: started
    enabled: yes

- name: permit apache
  ansible.posix.firewalld:
    service: http
    permanent: yes
    state: enabled
    immediate: yes

#ansible-navigator collections可以查看posix集合
#ansible-navigator doc ansible.posix.firewalld -m stdout

#以上25-30行客替换为如下:
- name: permit apache
  ansible.builtin.shell: firewall-cmd --permanent --add-service=http
- name: permit apache
  ansible.builtin.shell: firewall-cmd --reload

[student@control ansible]$ vim roles/apache/templates/jin2.j2  #编写模板文件
ipadd={{ ansible_default_ipv4.address }}  hostname={{ ansible_hostname }}

[student@control ansible]$ vim roles/apache/handlers/main.yml   #编写处理程序
---
- name: restart
  ansible.builtin.service:
    name: httpd
    state: restarted
11.2.4 playbook中使用角色
[student@bastion ansible]$ vim roles.yml
---
- name:
  hosts: servera
  roles:     #roles字段用来调用角色
  - apache   #被调用角色的名称
  - xxx
[student@bastion ansible]$ ansible-navigator run -m stdout roles.yml
[student@control ansible]$ curl servera
ipadd=172.25.250.10  hostname=servera
11.3 外部内容源部署角色
从Git存储库或AnsibleGalaxy等外部资源中选择和检索角色,并在playbook中使用
11.3.1 外部内容来源
#角色有多种获取方式:
1.本地tar包安装   2.通过网络地址安装   3.通过文件同时安装网络中多个地址角色

roles/requirements.yml
- src: #角色网址
  varsion:#角色版本
  name:#安装在本地的角色名
- src:
  name:

ansible-galaxy role install -r roles/requirements.yml -p roles
-r 指定文件路径
-p 指定角色安装路径
roles/requirements.yml  角色安装信息,包括地址,角色名称等
11.3.2 角色部署
#示例:
1.将phpinfo.tar,haproxy.tar上传到Linux,kiosk家目录下,用kiosk登录
2.将两个角色包拷贝到foundation0的rhel9.0目录中
$ ssh root@localhost cp /home/kiosk/{phpinfo.tar,haproxy.tar} /content/courses/rh294/rhel9.0/materials
3.打开foundation0的浏览器输入http://172.25.254.254/materials/就可以看到两个软件包

[student@workstation ansible]$ mkdir roles
[student@workstation ansible]$ $ vim ansible.cfg
[defaults]
roles_path=/home/student/ansible/roles
[student@workstation ansible]$ vim roles/requirements.yml
---
- src: http://172.25.254.254/materials/haproxy.tar
  name: balancer
- src: http://172.25.254.254/materials/phpinfo.tar
  name: phpinfo

[student@workstation ansible]$ ansible-galaxy install -r roles/requirements.yml
[student@workstation ansible]$ ansible-galaxy list
# /home/student/ansible/roles
- apache, (unknown version)
- balancer, (unknown version)
- phpinfo, (unknown version)
11.4 内容集合获取角色和模块
从Ansible内容集合中获取一组相关角色、补充模块和其他内容,并在playbook中使用
11.4.1 Ansible内容集合
1.随着模块数量增加,管理困难。模块需要唯一名称,并保持更新
2.借助Ansible内容集合,Ansible代码可以与模块和插件分开更新
3.Ansible 内容集合可提供一组在playbook中使用的相关模块、角色和其他插件,便于供应商和开发人员按照自己的节奏维护和分发集合,而不受Ansible版本的影响
11.4.2 Ansible内容集合的命名空间
1.命名空间是集合名称的第一部分
2.由Ansible社区维护的所有集合可能会放入community命名空间中名称类似于:
community.crypto
community.postgresql
community.rabbitmq
3.红帽直接维护和支持的Ansible内容集合可能使用redhat命名空间有:
redhat.rhv
redhat.satellite
redhat.insights等名称
11.4.3 Ansible内容集合的来源
无论是将ansible-navigator 用于最小自动化执行环境,还是在裸机Ansible Core上使用ansible-playbook,始终至少有一个可用Ansible内容集合:ansible.builtin
自动化执行环境可能还内置了其他自动化执行环境,例如,红帽Ansible 自动化平台2.2使用的默认执行环境ee-supported-rhel8
如果需要其他Ansible内容集合,可以将其添加到Ansible项目的collections子目录中,可以从多个来源获取Ansible内容集合:
1.自动化中心
2.私有自动化中心
3.Ansible Galaxy
4.第三方Git存储库或存档文件
11.4.4 安装Ansible内容集合
#配置文件ansible.cfg中设置了collections_paths选项来指定集合的默认路径:
~/.ansible/collections;/usr/share/ansible/collections
#如果消除这两个目录的指定,则ansible-navigator无法在这些目录的其版本中找到自动化执行环境内提供的Ansible内容集合
$ ansible-galaxy collection install 集合 -p collections
-p collections 选项会将该集合安装到本地collections子目录中或者不适用-p,而在ansible.cfg文件中collections_paths选项来指定集合的默认路径

#集合的来源可以是:本地、互联网、git仓库
1.使用要求文件安装Ansible内容集合
# 1.将三个集合包上传到Linux,kiosk家目录下,用kiosk登录
# 2.将三个集合包拷贝到foundation0的rhel9.0目录中
  $ ssh root@localhost cp /home/kiosk/{community-general-5.5.0.tar.gz,redhat-insights-1.0.7.tar.gz,redhat-rhel_system_roles-1.19.3.tar.gz} /content/courses/rh294/rhel9.0/materials
# 3.打开foundation0的浏览器输入http://172.25.254.254/materials/就可以看到两个软件包

【workstation】
1.创建存储集合的位置
$ mkdir /home/student/ansible/mycollections
$ vim ansible.cfg
[defaults]
...
#集合默认路径不删除,额外添加当前用户工作目录中集合路径
collections_path=/home/student/ansible/mycollection:~/.ansible/collections:/usr/share/ansible/collections

2.部署requirements.yml文件
$ vim /home/student/ansible/mycollections/requirements.yml
---
collections:
- name: http://172.25.254.254/materials/community-general-5.5.0.tar.gz
- name: http://172.25.254.254/materials/redhat-insights-1.0.7.tar.gz
- name: http://172.25.254.254/materials/redhat-rhel_system_roles-1.19.3.tar.gz

3.安装集合
$ ansible-galaxy collection install -r requirements.yml -p /home/student/ansible/collections/mycollections
$ ansible-galaxy collection list
11.5 利用系统角色重用内容
编写利用红帽帽企业Linux的系统角色执行标准操作的 playbook
11.5.1 内容集合安装系统角色
#内容集合 redhat.rhel_system_roles

$ mkdir /home/student/ansible/collections
$ vim /home/student/ansible/collections/requirements.yml
---
collections
name: redhat.rhel system roles

$ ansible-galaxy collection install -p collections/ -r home/student/ansible/collections/requirements.yml

$ sudo find ./mycollection/ -name  selinux-playbook.yml #不安装角色包可以使用该条命令搜索
$ find mycollection/ -name '*.yml' | grep selinux
$ cp /usr/share/ansible/collections/ansible_collections/redhat/rhel_system_roles/docs/selinux/selinux-playbook.yml /home/student/ansible/selinux.yml
11.5.2 rpm包安装系统角色
1.系统角色使用流程
1.通过软件安装获得系统角色(rhel-system-roles.noarch)
2.定义系统角色路径(存放角色的位置),并将其记录配置文件
cd /;ansible-galaxy list   , vim ~/ansible/ansible.cfg/;roles_path=xxxx:xxxx
3.使用系统角色,将系统角色添加至playbook,并修改内容
4.应用
2.安装系统角色
1.安装
系统帮助我们定义了一些角色,有不同的功能,需要通过安装软件包。
[greg@control ansible]$ cd /
[greg@control /]$ sudo yum search roles
[greg@control /]$ sudo yum install -y rhel-system-roles.noarch
[greg@control /]$ ansible-galaxy list    #在根目录下查看角色路径,该路径为默认系统角色路径
# /usr/share/ansible/roles     #系统角色路径
- linux-system-roles.kdump, (unknown version)
....
- rhel-system-roles.timesync, (unknown version)
# /etc/ansible/roles
 [WARNING]: - the configured path /home/greg/.ansible/roles does not exist.


2.定义角色路径
[greg@control /]$ cd ~/ansible/   #在ansible工作目录中查看时属于greg用户定制的角色路径
[greg@control ansible]$ vim ansible.cfg
roles_path    = /home/greg/ansible/roles:/usr/share/ansible/roles #:冒号分割,并添加系统角色路径
[greg@control ansible]$ ansible-galaxy list
# /home/greg/ansible/roles                        #之前定义好的自定义角色路径
- apache, (unknown version)
# /usr/share/ansible/roles                      #系统角色路径
- linux-system-roles.kdump, (unknown version)
......
- rhel-system-roles.timesync, (unknown version)

3.使用系统角色,将系统角色添加至playbook并应用
[greg@control ansible]$ rpm -ql rhel-system-roles.noarch | grep timesync #看README.md
[greg@control ansible]$ cp /usr/share/doc/rhel-system-roles/timesync/example-timesync-playbook.yml /home/greg/ansible/timesync.yml   #找例子,并复制到工作目录中
[greg@control ansible]$ vim timesync.yml      #编辑角色
---
- hosts: all
  vars:
    timesync_ntp_servers:
      - hostname: 172.25.254.254
        iburst: yes
  roles:
    - rhel-system-roles.timesync

4.使用系统角色
[greg@control ansible]$ ansible-playbook timesync.yml

查询验证
ansible all -a 'chronyc sources -v'
11.5.3 通过内容集合安装使用系统角色
# 1.timesync
$ cp /usr/share/ansible/collections/ansible_collections/redhat/rhel_system_roles/docs/timesync/multiple-ntp-servers.yml  timesync.yml
$ vim timesync.yml
- hosts: all
  vars:
    timesync_ntp_servers:
      - hostname: 172.25.254.254
        iburst: yes
  roles:
    - redhat.rhel_system_roles.timesync
$ ansible-navigator run timesync.yml -m stdout
$ ansible all -m shell -a 'chronyc sources -v '

# 2.selinux
$ cp /usr/share/ansible/collections/ansible_collections/redhat/rhel_system_roles/docs/selinux/selinux-playbook.yml selinux.yml
$ vim selinux.yml
---
- hosts: all
  vars:
    selinux_policy: targeted
    selinux_state: permissive

  roles:
  - redhat.rhel_system_roles.selinux
$ ansible-navigator run selinux.yml  -m stdout
# 验证
$ ansible all -m shell -a 'grep ^SELINUX= /etc/selinux/config'
11.6 通过文件安装角色
Ansible官网:https://docs.ansible.com/ansible/2.9/galaxy/user_guide.html#installing-roles-from-galaxy

https://galaxy.ansible.com/nginxinc/nginx_core  #该网站可以查看角色包信息

#实验需要在模拟考试环境下做,普通环境没有角色包
[greg@control ansible]$ vim roles/requirements.yml  #制作角色部署文件
---
- src: http://materials/phpinfo.tar    #角色在网络中的路径
  name: phpinfo                           #指定安装在系统中的角色名称
- src: http://materials/haproxy.tar
  name: balancer

[greg@control ansible]$ ansible-galaxy install --help
[greg@control ansible]$ ansible-galaxy install -r roles/requirements.yml  #-r 指定角色文件
[greg@control ansible]$ ansible-galaxy list   #检测
# /home/greg/ansible/roles
- phpinfo, (unknown version)    #查看结果
- balancer, (unknown version)
12 对Ansible进行故障排除
12.1 对playbook进行故障排除
12.1.1 调试Playbook
-rhel8
ansible-playbook debug.yml -v   #显示详细信息-v -vv -vvv -vvvv

-rhel9
ansible-navigator run playbook.yml -m stdout -v
12.1.2 Debug
#通过debug模块打印收集到的变量信息,帮助管理员了解模块执行过程及结果
---
- hosts: serverb
  tasks:
  - name: install the latest version of Apache
    ansible.builtin.yum:
      name: vsftpd
      state: latest
    register: web_install   #注册变量收集模块的执行信息
  - ansible.builtin.debug:
      var: web_install      #debug模块可以帮助打印出执行信息

#可以一次性将hostvars收集到的所有魔法及事实变量打印出来,并可以记录到文件中
[greg@control ansible]$ vim debug.yml
---
- name: test
  hosts: node1
  tasks:
  - ansible.builtin.debug:
      var: hostvars
[greg@control ansible]$ ansible-navigator run -m stdout debug.yml > 2.txt


关闭事实收集
如果要关闭收集,可以编辑配置文件
gathering = explicit
或者在playbook里
gather_facts: yes/no  true/false
12.1.3 检查Playbook的错误
-RHEL8
$ ansible-playbook playbook.yml --syntax-check
playbook: playbook.yml

-RHEL9
greg@control ansible]$ ansible-navigator run -m stdout debug.yml   --syntax-check
playbook: /home/greg/ansible/debug.yml
12.1.4 检查Playbook的问题
#常见语法问题
name:  冒号后面要空格,内容随意
hosts: all 指定的主机不在清单中,报错无partten
syntax-errors:注意格式缩进,2格缩进
变量设置错误,或调用时错误(变量名写错,变量开头要加双引号)
when条件: (逻辑判断思路错误,或书写错误)
12.1.5 检查Playbook工件和日志文件
# ansible-navigator可以生成playbook工件,以JSON格式存储与playbook的运行相关的信息
# 可以将与playbook运行相关的信息记录到系统上您可写入位置处的文本文件中
# RHEL9中的ansible自动开启日志功能,可通过配置文件设置及手工设置

# 配置文件
$ vim ~/.ansible-navigator.yml
---
ansible-navigator:
  execution-environment:
    image: utility.lab.example.com/ee-supported-rhel8:latest
    pull:
      policy: missing
  playbook-artifact:
    enable: false    # false/true 关闭/打开

# 手工指定
--pae  --playbook-artifact-enable
12.1.6 输出记录到文本文件
-RHEL8&9

1.Ansible提供了一个内置日志基础架构,可通过ansible.cfg配置文件[defaults]部分中的log_path参数或$ANSIBLE_LOG_PATH环境变   量进行配置。在进行上面一项或两项配置后,Ansible会以文本形式将ansible-navigator命令的输出存储到所配置的日志文件中。此机制   也适用于ansible-playbook等早期的工具
2.如果将Ansible配置为将日志文件写入/var/log,红帽建议您配置logrotate来管理文件
12.2 对Ansible受管主机进行故障排除
12.2.1 Ansible运行临时命令
# ad-hoc命令可以用于简单部署场景,比如对一组目标部署一个任务,或检索受管节点的运行情况、状态等
ansible all -m ping

# RHEL9中默认不允许root用户登录,需要修改配置文件允许root登录。所建议使用普通用户作为远程管理用户
# 解决方法,服务器端:
$ vim /etc/ssh/sshd_config
# PermitRootLogin prohibit-password
PermitRootLogin yes
$ systemctl  reload sshd
12.2.2 手动控制执行
$ ansible-playbook playbook.yml --step
$ ansible-navigator run playbook.yml  -m stdout --step

PLAY [PLAY1] ********************************************************************************************
Perform task: TASK: Gathering Facts (N)o/(y)es/(c)ontinue: n

#手动输入n  y c来控制playbook中执行的步骤
1.n 不执行该步骤
2.y 执行该步骤
3.c 继续自动执行到结束
# 通过该方法可以让有问题的步骤执行,而无关紧要的步骤可以跳过不执行。达到排错的目的
12.2.3 从指定步骤执行任务
[greg@control ansible]$ ansible-playbook playbook.yml --start-at-task='Start service httpd'

--start-at-task   #指定具体执行步骤,等号后面指定模块的描述,如果描述内容中有空格,建议用单或双引号引起来,表示为一个参数
12.2.4 烟雾测试
# 烟雾测试:在管理节点执行剧本,显示剧本的真实执行结果,但是不在受管节点上部署
$ ansible-playbook playbook.yml --help | grep \\-C
$ ansible-navigator run playbook.yml  -m stdout -C
[greg@control ansible]$ vim playbook.yml
---
- name: PLAY1
  hosts: node2
  tasks:
  - name: install  apache
    ansible.builtin.yum:
      name: httpd
      state: latest
  - name: Copy using inline content
    ansible.builtin.copy:
      content: 'test web page'
      dest: /var/www/html/index.html
  - name: Start service httpd
    ansible.builtin.service:
      name: httpd
      state: started
  - name: Start service firewalld
    ansible.builtin.service:
      name: firewalld
      state: started
  - name: permit apache
    ansible.posix.firewalld:
      service: http
      permanent: yes
      state: enabled
      immediate: yes
[greg@control ansible]$ ansible-playbook playbook.yml -C
12.2.5 发送脚本解决问题
$ vim test.sh   #自定义脚本名及内容
#!/bin/bash
date
$ vim debug.yml #剧本名自定义
---
- name:
  hosts: node1
  tasks:
  - name: Run a script
    ansible.builtin.script: /home/greg/ansible/test.sh    #使用script模块,加脚本文件路径
    register: haha   #register收集上面模块执行结果至 haha(自定义名称)的这个变量中
  - ansible.builtin.debug:
      var: haha   #通过debug模块将haha变量的值打印出来。
$ ansible-playbook debug.yml

`如果不想写register,可以执行剧本时添加-v 类似:ansible-playbook debug.yml -v`
13 自动执行Linux管理任务
13.1 管理软件和订阅
13.1.1 优化多软件包安装
ansible.builtin.---

- name:
  hosts: all
  tasks:
  - name: install the latest version of Apache
    ansible.builtin.yum:
      name: httpd   #httpd
      state: latest
  - name: install the latest version of Apache
    ansible.builtin.yum:
      name: php   #php
      state: latest
---------------------------------------------
- name: install the latest version of Apache
  ansible.builtin.yum:
      name: "{{ item }}"
      state: latest
  loop:     #用loop方式简化playbook
    - httpd
    - php

yum install -y httpd
yum install -y php
---------------------------------------------
- name: install the latest version of Apache
  ansible.builtin.yum:
    name:
    - httpd
    - php
    state: latest
yum install -y httpd php
---------------------------------------------
- name: ensure a list of packages installed
  ansible.builtin.yum:
    name: "{{ packages }}"
  vars:
    packages:
    - httpd
    - httpd-tools
---------------------------------------------

# 等同于:yum install -y httpd php或 loop的这种方式,系统会执行两次独立事务,对每个事务应用一个软件包
# yum模块:
  state: absent删除, installed,  present确保安装  latest升级到最新版本
  latest 等同  yum update

 name: '*'  代表所有软件包
 name: "@RPM Development tools"   ansible命令里面安装包组要加@
13.1.2 收集已安装软件包的事实
---
- name:
  hosts: node1
  tasks:
  - name: Gather the package facts
    ansible.builtin.package_facts:
      manager: auto

  #- name: Print the package facts
  #  ansible.builtin.debug:
  #    var: ansible_facts.packages

  - name: Check whether a package called foobar is installed
    ansible.builtin.debug:
      msg: "{{ ansible_facts.packages.zip.0.version }}"
13.1.3 管理软件包的其他模块
- name: Install httpd on RHEL 8 and 9
  ansible.builtin.dnf
    name: httpd
    state: present

- name: Install httpd on RHEL 7 and earlier
  ansible.builtin.yum:
    name:httpd
    state:present
13.1.4 RPM软件包存储库
$ ansible-doc -l | grep yum

---
- name:
  hosts: node1
  tasks:
  - name: Add multiple repositories into the same file (1/2)
    ansible.builtin.yum_repository:
      name: EX294_BASE #file字段不存在时,默认用name字段代替源文件名称
      description: EX294 base software
      file: rhel  #file选项作用是定义yum源文件名称,无该字段时会用name字段后的值代替文件名 例如:rhel.repo
      baseurl: http://content/rhel8.4/x86_64/dvd/BaseOS
      gpgcheck: yes
      gpgkey: http://content/rhel8.4/x86_64/dvd/RPM-GPG-KEY-redhat-release
      enabled: yes

  - name: Add multiple repositories into the same file (1/2)
    ansible.builtin.yum_repository:
      name: EX294_STREAM
      description: EX294 stream software
      file: rhel  #多个模块使用同一个file字段的名称时,会将源地址写入到同一个文件中。
      baseurl: http://content/rhel8.4/x86_64/dvd/AppStream
      gpgcheck: yes
      gpgkey: http://content/rhel8.4/x86_64/dvd/RPM-GPG-KEY-redhat-release
      enabled: yes  #enabled默认值为yes,考试时要写该选项。


ansible模块选项和vim配置文件内容对比
  vim:                ansible:
      rhel.repo          file
      [rhel]            * name
      name=rhel         * description
      baseurl=            * baseurl
      gpgcheck=            * gpgcheck
      gpgeky=            * gpgkey
      enabled=            * enabled

#测试方法:$ ansible all -a 'yum repolist all'
# 受管节点检测  $ cat rhel.repo
$ ansible-doc rpm_key
- ansible.builtin.rpm_key:
    state: present
    key: http://apt.sw.be/RPM-GPG-KEY.dag.txt
13.2 管理用户和身份验证
13.2.1 user模块
#在servera上创建用户tom 附加组为group1,并设置密码为password tom: tom123用sha512方式哈希,uid =2000
#user这个模块类似这些功能: useradd userdel usermod

$ cat group.yml
- name:
  hosts: node1
  vars:
  - passwordtom: tom123
  tasks:
  - name:  create group
    ansible.builtin.group:
      name: "{{ item }}"
    loop:
      - group1
      - group2
  - name: Add the
    ansible.builtin.user:
      name: tom            #useradd tom
      comment: student     #useradd -c student
      uid: 2000            #useradd -u 2000
      password_expire_max: 10     #passwd -e 10
      group: group1             #useradd -g group1
      groups: group1,group2     #-G group1,group2
      shell: /bin/bash          #-s /bin/bash
      password: "{{ passwordtom | password_hash('sha512') }}"    passwd tom
      #passwordtom该密码位置如果是字符串用单引号引起来,如果是变量则不需要单引号


#验证用户密码过期时间
chage -l tom
Password expires                    : Jun 11, 2024
#验证用户密码是否正确,可以从node2登录node1,测试node1上的tom用户
ssh tom@node1

Ansible网页搜索:password_hash--Using filter--网页中查找password_hash,查看密码哈希方式,一定注意是512
Ansible官网:  https://docs.ansible.com/ansible/latest/user_guide/playbooks_filters.html
      模块中:append: yes    如果想额外添加附加群组,此选项需要yes(usermod -a -G  grouptest u1)
13.2.2 group模块
[greg@bastion ansible]$ cat group.yml
---
- name:
  hosts: dev
  tasks:
  - name: Ensure group "grouptest" exists
    ansible.builtin.group:
      gid: 10000
      name: grouptest
      state: present | absent   #创建|删除 二选一

#等同于:groupadd  grouptest
#等同于:groupadd -g 10000 grouptest
#groupdel
13.3 管理启动过程和调度进程
13.3.1 at
---
- name:
  hosts: dev
  tasks:
  - name: Schedule a command to execute in 20 minutes as root
    ansible.posix.at:
      command: ls -d / >/dev/null
      count: 20
      units: minutes
# 默认是创建一个任务,给root,删除的    话使用选项state:absent
13.3.2 cron
[greg@bastion ansible]$ ansible-doc cron
[greg@bastion ansible]$ cat cron.yml
---
- name:
  hosts: all
  tasks:
  - name: Ensure a job that runs at 2 and 5 exists.
    ansible.builtin.cron:
      name: "check dirs"  #描述
      minute: "*/2"          #分钟
      hour: "2,5"         #小时
      day: 1-10           #天
      user: harry
      job: "ls -alh > /dev/null"

[greg@bastion ansible]$ ansible dev -m shell -a 'crontab -u harry -l'
13.3.3 管理服务
---
- name:
  hosts: dev
  tasks:
  - name: install the latest version of Apache
    ansible.builtin.yum:
      name: httpd
      state: latest

  - name: Start service httpd, if not started
    ansible.builtin.service:
      name: httpd
      state: started
      enabled: yes    #开机自启动
13.3.4 systemd
[greg@bastion ansible]$ cat systemd.yml
---
- name:
  hosts: dev
  tasks:
  - name: install the latest version of Apache
    ansible.builtin.yum:
      name: httpd
      state: latest

  - name: Make sure a service is running
    ansible.builtin.systemd:
      name: httpd
      state: started
      enabled: yes

测试命令:
ansible dev -m shell -a 'systemctl status httpd'
ansible dev -m shell -a 'systemctl is-enabled httpd'

# 1.reboot
- name: Unconditionally reboot the machine with all defaults
  reboot:

# 2.command & shell  支持更多的特殊字符
$ ansible servera -m command -a 'useradd user1'
$ ansible servera -a 'useradd user2'
$ ansible servera -a 'echo 123456 | passwd --stdin user1'
$ ansible servera -m shell -a 'echo 123456 | passwd --stdin user1'
13.4 管理存储
| 模块名 | linux指令 | Linux实施命令 |
|---|---|---|
| community.general.parted | parted | parted /dev/vdb mkpart part1 2048s 1G |
| community.general.lvg | vgcreate | vgcreate -s 16M vg100 /dev/vdb{1..2} |
| community.general.lvol | lvcreate | lvcreate -L 100M -n lv100 vg100 |
| community.general.filesystem | mkfs | mkfs.ext4 /dev/vg100/lv100 |
| ansible.posix.mount | /etc/fstab | echo “/dev/vg100/lv100 ext4 /mnt/data defaults 0 0” > /etc/fstab |
13.4.1 模块管理存储
1.纯分区无lvm逻辑卷
1-1 分区 community.general.parted #先确保community.general集合已经安装,可通过ansibl-galaxy collection list来查看
# 创建两个分区每个500M
---
- name: parted
  hosts: node2
  tasks:
  - name: part 1 2048s-500M
    community.general.parted:
      device: /dev/vdc
      number: 1
      state: present
      part_end: 500MiB
  - name: part 2 500M-1000M
    community.general.parted:
      device: /dev/vdc
      number: 2
      state: present
      part_start: 500MiB
      part_end: 1GiB

1-2 格式化 community.general.filesystem
#两个分区都格式化为ext4文件系统,如果选择不同文件系统,可以分成两个模块。
  - name: Create a ext4
    community.general.filesystem:
      fstype: ext4
      dev: "{{ item }}"
    loop:
      - /dev/vdc1
      - /dev/vdc2

1-3 挂载 ansible.posix.mount
#自动创建挂载点/mnt/part1,再将/dev/vdc1写入/etc/fstab文件最后一行,并挂载。
  - name: Mount DVD read-only
    ansible.posix.mount:
      path: /mnt/part1      #挂载点
      src: /dev/vdc1        #设备
      fstype: ext4            #文件系统类型
      state: mounted        #参考下面解释

-挂载选项解释:
# absent:     卸载并删除/etc/fstab内容
# unmounted: 卸载不删除/etc/fstab内容
# present:   将挂在信息写入/etc/fstab,不挂载
# mounted:   将挂在信息写入/etc/fstab,并创建挂载点及挂载
# remounted: 重新挂载
2.有lvm逻辑卷
2.分区-lvm(pv,vg,lv)-格式化-挂载
2-1 分区 community.general.parted
#分两个区每个大约500M,/dev/vdb
---
- name: lv
  hosts: node2
  tasks:
  - name: part 1 2048s-500M
    community.general.parted:
      device: /dev/vdb
      number: 1
      state: present
      part_end: 500MiB
  - name: part 2 500M-1000M
    community.general.parted:
      device: /dev/vdb
      number: 2
      state: present
      part_start: 500MiB

2-2 pv+vg community.general.vg
#两个分区都加入vg,名称vg100
#ansible-navigator collections -m stdout | grep vg$ 查看帮助
  - name: Create a volume group vg100
    community.general.lvg:
      vg: vg100
      pvs: /dev/vdb1,/dev/vdb2
      pesize: 32

2-3 lv community.general.lvol
#创建一个lv名为lv100,大小800M
  - name: Create a logical volume lv100 size 800M
    community.general.lvol:
      vg: vg100
      lv: lv100
      size: 800
2-4 格式化 community.general.filesystem
#格式化为xfs文件系统
 - name: Create a xfs
    community.general.filesystem:
      fstype: xfs
      dev: /dev/vg100/lv100
2-5 挂载 ansible.posix.mount
#lv挂载到/mnt/data,并设置为开机自启动。
  - name: /mnt/data
    ansible.posix.mount:
      path: /mnt/data
      src: /dev/vg100/lv100
      fstype: xfs
      state: mounted

#整体配置
---
- name: lv
  hosts: node2
  tasks:
  - name: part 1 2048s-500M
    community.general.parted:
      device: /dev/vdb
      number: 1
      state: present
      part_end: 500MiB
  - name: part 2 500M-1000M
    community.general.parted:
      device: /dev/vdb
      number: 2
      state: present
      part_start: 500MiB
  - name: Create a volume group vg100
    community.general.lvg:
      vg: vg100
      pvs: /dev/vdb1,/dev/vdb2
      pesize: 32
  - name: Create a logical volume lv100 size 800M
    community.general.lvol:
      vg: vg100
      lv: lv100
      size: 800
  - name: Create a xfs
    community.general.filesystem:
      fstype: xfs
      dev: /dev/vg100/lv100
  - name: /mnt/data
    ansible.posix.mount:
      path: /mnt/data
      src: /dev/vg100/lv100
      fstype: xfs
      state: mounted
13.4.2 系统角色管理存储
# 逻辑卷角色
[greg@control ansible]$ sudo find ./mycollection/ -name '*.yml' | grep storage|grep test.yml
./mycollection/ansible_collections/redhat/rhel_system_roles/tests/storage/test.yml
[greg@control ansible]$ cp ./mycollection/ansible_collections/redhat/rhel_system_roles/tests/storage/test.yml ./storage.yml
[greg@control ansible]$ vim disk.yml
$ vim storage.yml
---
- hosts: node4
  vars:
    storage_use_partitions: true

  roles:
    - name: redhat.rhel_system_roles.storage
      storage_pools:
        - name: vg100
          disks:
          - /dev/vdb
          volumes:
            - name: lv100
              size: 200M
              fs_type: ext4
              mount_point: '/mnt/lvm100'
              state: "present"
            - name: lv200
              size: 300M
              fs_type: xfs
              mount_point: '/mnt/lvm200'
              state: "absent"

$ ansible-navigator run storage.yml  -m stdout
13.5 管理网络
[greg@control ansible]$ sudo find ./mycollection/ -name '*.md' | grep network
[greg@control ansible]$ vim ./mycollection/ansible_collections/redhat/rhel_system_roles/roles/network/README.md
[greg@control ansible]$ sudo find ./mycollection/ -name '*.yml' | grep network

$ vim /usr/share/doc/rhel-system-roles/collection/roles/network/README.md
$ vim playbook.yml
---
- hosts: node5
  vars:
    network_connections:
    - name: eth0
      interface_name: eth0
      type: ethernet
      state: up
      autoconnect: yes
      ip:
        address:
        - 192.0.2.3/24
        dns:
        - 192.0.2.2
        dns_search:
        - example.com
        dhcp4: no
        gateway4: 192.0.2.1
        auto6: no

  roles:
    - redhat.rhel_system_roles.network

$ ansible-navigator run playbook.yml  -m stdout
14 普通用户远程管理受管主机
14.1 超级用户远程管理方式
vim /home/greg/ansible/ansible.cfg
remote_user=root
host_key_checking = False

vim /home/greg/ansible/inventory
[all:vars]
#ansible_user=root
ansible_password=redhat
14.2 普通用户远程管理方式
# 使用greg用户远程管理受管主机
【bastion】控制节点
ansible.cfg
[defaults]
remote_user = greg
host_key_checking = False

[privilege_escalation]
become=True
become_method=sudo
become_user=root
become_ask_pass=false

#管理节点
ssh-keygen

ssh-copy-id greg@workstation
ssh greg@workstation

#其他受管主机上每一个主机都做如下操作
[root@workstation ~]# useradd  greg
[root@workstation ~]# echo redhat | passwd --stdin greg
[root@workstation ~]# visudo
greg    ALL=(ALL)       NOPASSWD: ALL